This article is intended to get you started when you want to add findings one at a time, and not from a custom findings template. Nucleus allows you to bypass the templating system to add a finding one at a time if that works better for your process.
Overview
You can add custom findings to Nucleus one at a time from two places:
-
Vulnerabilities > Active
-
Assets > Asset Management > Click any asset to open an Asset Details window
The process is roughly the same from either place, but adding a custom finding from an Asset Details page makes it a little bit quicker if you are only adding the finding to one asset, as the asset affected by the vulnerability will be preselected for you.
Adding a Custom Finding From the Active Vulnerabilities Page
To add a custom finding from the active vulnerabilities list, use the following steps:
- On the Vulnerabilies > Active page of a Project, click Add Finding > Custom.
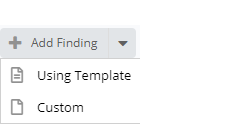
- This will open a 3-step pop-up modal to create your custom finding, each step detailed below
Step 1 - Add Vulnerability Details
There are 3 required fields here to move onto the next step:
| Field | Info |
|---|---|
| Finding Name | This is what will show up on the active vulnerabilities list, so make it a unique name so you know what the issue is. |
| Severity | The severity of the vulnerability finding. This is the required attribute that Nucleus uses to rank the vulnerability in the UI. |
| Finding Type* | Nucleus allows for the creation of multiple types of findings. This allows you to get really granular with information entered and shown in Nucleus. |
Finding Types
| Type | Info |
|---|---|
| Code | This allows you to enter in code-specific types of information, such as code snippets, affected files, and line numbers. |
| Device | This allows you to enter in host-specific information, such as the affected port the service is running on. |
| Web Application | This allows you to enter in the HTTP Request and Response. |
| General | This is designed for more generic findings that do not affect a specific type of asset. |
Once you have selected the above fields, you can click Next or you can enter in any of the additional fields below.
Every other field is optional, but detailed here:
For evidence, you can add screenshots to the Solution field (i.e., reproduction steps) of a custom finding. This will show up in vulnerability reports as an embedded image. Or, in Step 3 of the Add Custom Finding window, you can add evidence as a file to the individual instances of any finding.
| Field | Info |
|---|---|
| Description | This is probably the most important optional field. This is the description of the vulnerability and will be what shows on the vulnerability details page. |
| Solution | This is the field where the assessor/analyst can enter in the solution on how to fix the vulnerability you are creating. |
| Impact | This allows the user to enter in the impact of the vulnerability to their organization. |
| Likelihood | This value is the likelihood that the vulnerability will be exploited based on the analysis of the analysis. |
| Exploitable | This field will show whether or not the vulnerability has an exploit available in the wild. |
| CVSS/CWSS Score | This allows the user to assign a CVSS or CWSS score to the finding based on their analysis of the finding. |
| CVE/CWE Number | If this finding is affected by a CVE, CWE, or multiple, you can enter in those values here. |
| References | This is where the analyst can enter in any references that may help the user fix the vulnerability, read more etc. |
References adheres to the following format: key-value
Example: OWASPURL-https://example.com
Click Next to move to the next step.
Step 2 - Select Assets Affected By The Finding
Use the checkboxes to select the assets affected by this vulnerability. You can select multiple, and this page will populate based on the type of vulnerability you selected in Step 1. (For example, you cannot put a code snippet on a host.). The selected assets will show up in Step 3.
Step 3 - Add Instance Details
Each asset that you selected in Step 2 will show up on this page. Here is where you can enter in the specific asset information.
Think about it like this, you may have a SQL Injection Vulnerability which has a generic Description and a Solution. But where it shows up on each asset might be in a specific HTTP Request with a specific associated parameter. Step 3 is where you can specify the HTTP Request to reproduce the vulnerability and to report exactly where the SQL Injection vulnerability is located on each asset.
To add another place on the same asset affected by this same vulnerability, use the "Clone Finding" button.
This is extremely useful to do two things:
-
Add another place where the vulnerability exists on the same asset
-
Clone the details from the finding instance to another instance. (So maybe the same HTTP Request causes the vulnerability, you can clone that to another location on the asset without having to do more copying and pasting).
On this page, enter in the associated information with each asset. All fields on this page are optional, but it is recommended to enter in information for organizational and reproduction purposes.
The following fields (location fields) are used to determine the uniqueness of a finding on each asset, so it is recommended that you enter in this information.
| Finding Type | Fields to Complete |
|---|---|
| Code | Filename and Line Number are the two fields which determine the location of a vulnerability for code findings. |
| Device | Port is the field for this finding type used to determine location of the vulnerability. |
| Web Application | Path is the field used to determine the location. '/' is used for the root URL |
| General | All optional, but port allows for additional uniqueness if necessary. |
You have now created a custom finding! If you have any questions, please reach out to Nucleus Customer Support at [email protected].