Overview
The purpose of this article is to help you understand what the graphs and metrics mean on the Nucleus Trends Page.
Navigating to the Trends Page
The trends page is located at the project level under Vulnerabilities > Trends
Using Filters
The Trends page offers several filters to help you focus on the data most relevant to your analysis:
Date Range - Set the time period for your charts
Discovered Date - Filter to vulnerabilities discovered within a specific window (e.g., last 30 days)
Severity - Focus on specific severity levels
Asset Groups - Scope data to specific asset groups
Exploitable - Filter to exploitable vulnerabilities only
Filters can be accessed via the Filter menu at the top of the page.
Unique Vulnerability Metrics vs. Instance Vulnerability Metrics
The following charts are provided at both the unique and instance level:
Trends
Vulnerabilities Discovered
Vulnerabilities Remediated
Vulnerability Lifetime - Bar
Vulnerability Lifetime - Line
You may toggle between each level by selecting from the tab selector near the top of the page
The following chart is a rollup of asset and vulnerability context, and does not have a unique or instance level view:
Nucleus Risk Score
Understanding the Difference
View | What It Counts | Use When You Want To Know |
|---|---|---|
Unique Vulnerability Metrics | Distinct vulnerabilities (by finding ID and scan type), regardless of how many assets are affected | "How many different vulnerabilities do we have?" |
Instance Vulnerability Metrics | Every asset-vulnerability combination | "How many total remediation actions are needed?" |
Example: If CVE-2024-1234 exists on 10 servers:
Unique count = 1 (it's one vulnerability)
Instance count = 10 (ten places to fix it)
Vulnerability Trends (line chart)
The vulnerability trends chart shows the count of active (open) vulnerabilities in your organization over time, broken down by severity. Use this chart to assess the effectiveness of your vulnerability management program - a downward trend indicates progress in remediation, while an upward trend may signal a need for additional resources or budget.
All of your vulnerability scan results are displayed over time, with different lines representing different severity levels (Critical, High, Medium, Low). You can show or hide specific severity lines by clicking the colored circles in the legend.
This chart is designed to give stakeholders and leadership a clear, simple view of how your organization is managing vulnerabilities and risk over time.

Vulnerabilities Discovered
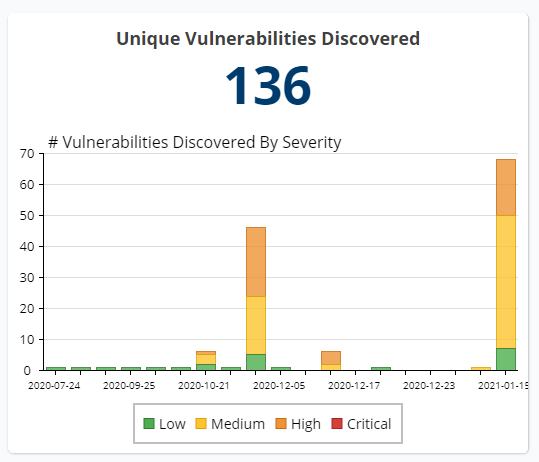
This chart shows when vulnerabilities were detected across your scans during the selected time period, broken down by severity.
Understanding "Discovered" Trends Page vs. Metrics Page
The discovered count includes:
Newly discovered vulnerabilities – findings appearing for the first time
Rediscovered vulnerabilities – findings that were previously resolved and have reappeared
This is intentional: the Trends page is designed to reflect your team's operational workload. A rediscovered vulnerability still requires remediation, and recurring rediscoveries may indicate a systemic issue worth investigating.
Understanding "Discovered" Trends Page vs. Metrics Page
You may notice differences between discovered counts on the Trends page and similar metrics elsewhere in Nucleus. This is by design, each view serves a different purpose:
Trends Page | Metrics Page | |
|---|---|---|
Rediscoveries | Included, to reflect operational workload | May exclude, to measure program effectiveness |
Asset scope | All assets, for full historical visibility | May filter to active assets only |
Tip: To narrow your Trends view to a specific discovery window, use the Discovered Date filter.
Vulnerabilities Remediated
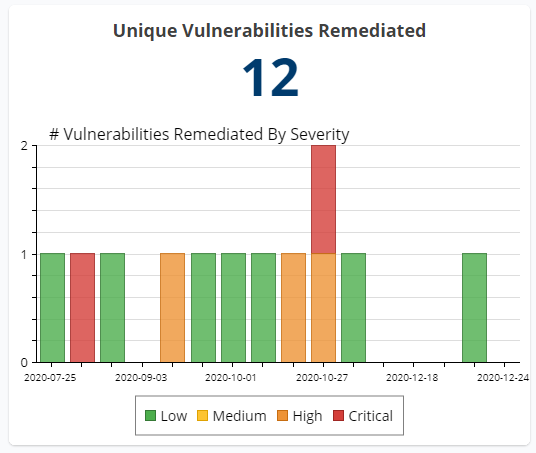
This chart shows when vulnerabilities were resolved across your scans during the selected time period, broken down by severity.
Understanding "Remediated"
The remediated count includes:
First-time remediations - findings resolved for the first time
Re-remediations - findings that were rediscovered and resolved again
Similar to the Discovered chart, this reflects your team's operational output. Recurring re-remediations of the same vulnerability may indicate an underlying issue that needs attention beyond patching.
Average Vulnerability Lifetime - Bar Chart
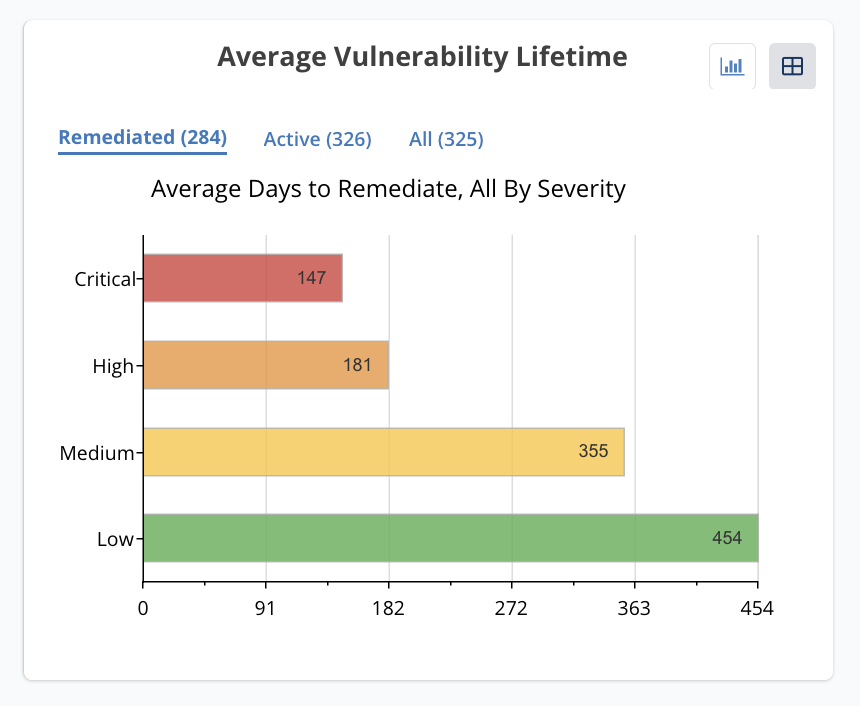
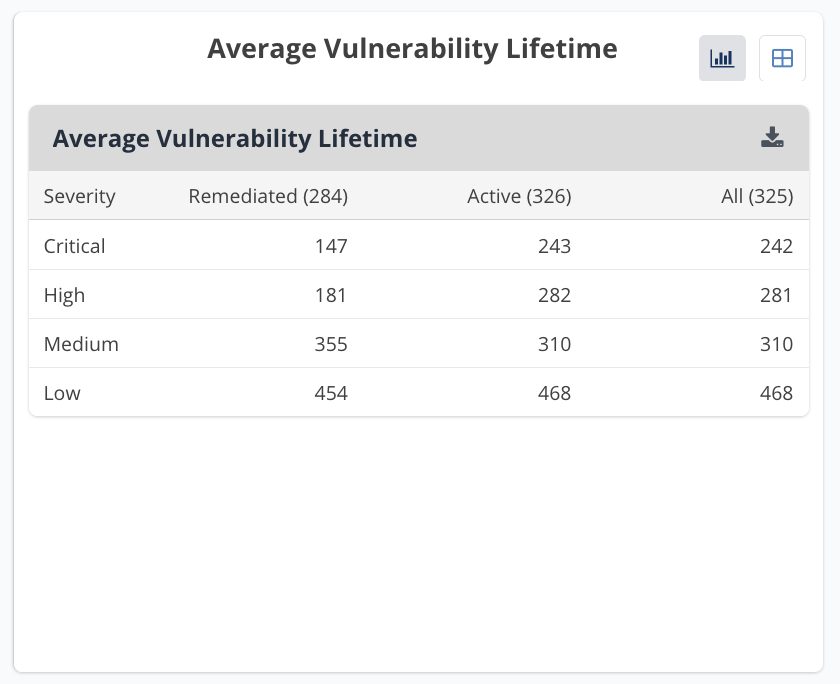
Average vulnerability lifetime gives your organization and stakeholders a measure of how long vulnerabilities of different severities are open and how long remediated vulnerabilities stayed open before being fixed. This helps organizations to determine if they are meeting their organizational SLAs and to give insight into the effectiveness of the vulnerability management program from that perspective.
Using the data: this data is valuable for reporting to stakeholders and leadership. For example, it allows a user to report to the C-suite, with evidence, that they are patching all critical vulnerabilities within 14 days of discovery. It enables easy comparison of the lifetime of remediated findings to the age of those that are currently open via the "Active" tab. The "All" count gives you a lifetime number that includes both remediated and active findings.
How it Works - Remediated
For unique vulns, the lifetime will be the time from discovery to remediation for vulns which became fully resolved during the selected time period. For instance, the metric will count from discovery to remediation of just the instances of vulns which were resolved during the selected time period.
How it Works - Active
For active vulns, the age will show the average length of time since discovery for all vulns which were active during the date range selected. At the unique level, this will count from the first discovery of any instance of that vulnerability, whereas at the instance level it will count only from the date on which specific instances were discovered.
How it Works - All
The All metric includes an average of the age of both the remediated and active findings.
Further Exploration of Date Ranges with Examples
You can think of date ranges as offering a view of the average lifetime metrics as they would appear from the perspective of that time period. For example:
Selecting a date range of last 30 days, when viewing the total remediated vulnerabilities chart you will see an average which will include all vulnerabilities which became fully resolved in the last 30 days ending today. The average will be calculated based on the difference between their discovered date and the date they were resolved.
Selecting a date range of May 1 through May 14, when viewing the total active vulnerabilities chart you will see the average length of time all vulnerability instances had been active as of May 14th.
Additional information - Realtime data calculation and using filters
All data in the bar chart is calculated in real time, meaning that if you select any filters, the data returned will be calculated with relevant data as it exists today. For example, if you select an asset group filter, you will see the average lifetime of the vulnerabilities on assets in that group at the time you select the filter. Adding or removing assets from the group will cause the numbers to change.
Screenshots
Consume this data via chart form, or use the table icon in the top right corner to switch to table form. From the table view, easily export the data to CSV.
Average Vulnerability Lifetime - Line Chart
Similarly to the average vulnerability lifetime bar chart, the average vulnerability lifetime line chart gives your organization and stakeholders a measure of how long vulnerabilities of different severities are open and how long remediated vulnerabilities stayed open before being fixed. The line chart adds a time dimension to the data so that you can see how your organization is improving according to this important metric.
How it works - Snapshot data
Important
Data is calculated for the average vulnerability lifetime line chart historically. Other charts on the trends page are calculated in real time. See below for more details.
Historical data is not available prior to September 2023.
In order to provide a useful portrayal of vulnerability age retrospectively, the average vulnerability lifetime line chart is calculated on stored data, as opposed to being calculated in real time. When viewing these charts, you will see an historical representation of the data as it existed on the dates on the x-axis. For example, if you filter by an asset group, you will see the data for that asset group as it existed historically, even if the assets in the group have changed recently. This allows you to view the vulnerability management situation as it was known to your team at the time.
Snapshot data collection
Average lifetime metrics are calculated and stored once a day on a nightly basis. The metrics on the chart therefore reflect the average vulnerability age at approximately 23:59 in your Nucleus instance's time zone on the date displayed.
SLA Compliance Trend
Overview
The SLA Compliance Trend metric on the Trends Page and Operations Overview measures the percentage of findings that are within their SLA (due date has not passed). This metric helps security teams track how well they’re meeting their remediation SLAs for the most critical vulnerabilities.
SLA compliance is calculated at the instance level (each asset-vulnerability combination). For more on how Unique vs. Instance metrics differ, see Unique Vulnerability Metrics vs. Instance Vulnerability Metrics above.
How its Calculated
Within SLA % = (Count of active findings within SLA ÷ Total active findings) × 100
Past Due % = (Count of active findings past Due Date ÷ Total active findings) × 100
Numerator: “Within SLA”
Counts findings that have:
A due date set, AND
The current date is on or before that due date
Note: Findings without a due date are not counted in the numerator—they cannot be “within SLA” if no SLA was set.
Denominator: “Total Active Findings”
Counts all findings captured in the daily snapshot, including:
Active findings with due dates
Active findings without due dates
Recently mitigated findings
What “Recently Mitigated” Means
Nucleus captures a daily snapshot of your vulnerability data. Findings that were mitigated on the same day as the snapshot are still included in that day’s total count.
Finding Status | Included in Snapshot? | Counted in Denominator? |
|---|---|---|
Active | Yes | Yes |
Mitigated (same day) | Yes | Yes |
Mitigated (prior day, already counted) | No | No |
In practice: If you remediate 90 findings today, they will still appear in today’s snapshot and count toward your total. Tomorrow’s snapshot will exclude them.
Example Calculation: Critical Vulnerabilities Withing SLA %
Finding Type | Count |
|---|---|
Active Critical (with due date, within SLA) | 220 |
Active Critical (without due date) | 51 |
Mitigated Critical (same day) | 90 |
Total in Snapshot | 361 |
Resulting Calculation
220 (within SLA) ÷ 361 (total) = 61%
Why Your Percentage May Seem Low
The denominator includes:
Findings without due dates — If you haven’t set a due date on a finding, it counts against your total but cannot count as “within SLA.”
Same-day mitigations — Findings you remediate today are still in today’s snapshot. This can temporarily inflate your denominator.
Tips to Improve Your Score
Set due dates on findings you’re actively tracking
Review your SLA Pass % the day after a large remediation effort to see the updated percentage
Frequently Asked Questions
Q: Why does my SLA Pass % not match what I see in Executive Metrics or Flex Reports?
A: Executive Metrics and Flex Reports calculate SLA compliance using only findings that have a due date set. The Trends Page and Operations Overview include all findings in the denominator, regardless of whether a due date is set.
Q: I just remediated a large batch of findings. Why didn’t my percentage improve?
A: Same-day mitigations are still included in today’s snapshot. Check your percentage tomorrow to see the updated calculation.
Q: What happens to findings I mark as False Positive or Accepted Risk?
A: These findings are treated as mitigated and will be excluded from future snapshots after the day they’re marked.
Nucleus Risk Score
The Nucleus Risk Score is a metric combining asset-specific context with vulnerability severity and threat intelligence data to create a dynamic representation of either your organization's overall vulnerability risk or the risk of specific groups of assets.
How it works - Snapshot data
Important
Data is calculated for the Nucleus risk score chart historically. Other charts on the trends page are calculated in real time. See below for more details.
Historical data is not available prior to September 2023.
In order to provide a useful portrayal of the Nucleus risk score retrospectively, the chart is calculated on stored data, as opposed to being calculated in real time. When viewing these charts, you will see an historical representation of the data as it existed on the dates on the x-axis. For example, if you filter by an asset group, you will see the data for that asset group as it existed historically, even if the assets in the group have changed recently. This allows you to view the vulnerability management situation as it was known to your team at the time.
Snapshot data collection
Nucleus Risk Score metrics are calculated and stored once a day on a nightly basis. The metrics on the chart therefore reflect the score at approximately 23:59 in your Nucleus instance's time zone on the date displayed.
Filtering the Nucleus Risk Score chart
The Nucleus Risk Score chart may be filtered by asset properties, but can not be filtered by vulnerability properties. If vulnerability filters are selected, this chart will ignore them.