Overview
Using the Nucleus Automation Engine, you can create Finding Processing Rules based on all of the available finding and asset criteria to automatically set due dates, make assignments, update statuses, and much more. For example, rules can be configured to set a due date as a specified number of days, weeks, or months from the time of ingestion, or the finding's discovered date.
Create Finding Processing Rules
Finding Processing Rules enable you to dynamically manage vulnerability and compliance type findings as they're ingested into Nucleus.
From within a project, navigate to the Automation page.
Select the Finding Processing tab and click the Add Rule button.
Enter the rule information as shown below.
⚠️ Case Sensitivity
When using exact match conditions (e.g., “is,” “is not,” or “equals”), case sensitivity is required.
For example, if your rule condition is set to match the value Production, it will not match production or PRODUCTION.
Step 1 - Rule name and criteria
Rule Name
Enter a name to recognize the rule, specify how it is used, and describe the parameters that trigger this rule. This rule name will be included in some of the notifications, for example: "Exploitable vulns (or compliance findings) on assets in IP range X to Y."
Finding Criteria
Finding criteria enable you to choose the conditions that activate the rule. You can set rules to match the following conditions:
Condition | Description | Field Type |
|---|---|---|
Assigned Team | The team(s) a finding is assigned to. | Supports is assigned, is unassigned, is one of, or is none of for a Nucleus Team |
Assignee | The user(s) a finding is assigned to. | Supports is assigned, is unassigned, is one of, or is none of for a Nucleus User |
CISA ADP SSVC Automatable | Whether CISA's ADP SSVC decision point marks exploitation as automatable. | Yes, No |
CISA ADP SSVC Exploitation | CISA's ADP SSVC exploitation status. | Supports is one of, is none of for None, Public PoC, or Active |
CISA ADP SSVC Technical Impact | CISA's ADP SSVC technical impact rating. | Supports is or is not for Partial or Total |
CISA KEV Vulnerability | Whether the vulnerability appears in CISA's Known Exploited Vulnerabilities (KEV) catalog. | Yes, No |
Custom Risk Level | Matches the finding's custom risk level; options reflect the levels configured for your organization's custom risk score. Available when custom risk scoring is configured. | Supports is one of, is none of for your configured custom risk score |
Custom Risk | The finding's custom risk score, using the range configured for your organization. Available when custom risk scoring is configured. | Supports greater than, less than, equals, or a range for a numeric range |
CVE | The CVE identifier(s) associated with the finding. Supports contains, is any of, or is all of. | Supports contains, is any of, or is all of for a CVE or CVE values |
CVE Exists | Whether the finding has an associated CVE. | Yes, No |
CVSS Score | The finding's CVSS score. | Supports greater than, less than, equals, or a numeric range (0.0–10.0). |
Description | Search field where you can search for strings in the description of the vulnerability for additional granular triggering. | Freeform text |
Discovered | Number of days since the finding was first discovered. | Supports less than, greater than for a number of days |
Due Date | Number of days until (or since) the finding's remediation due date. | Supports due in or past due for a number of days |
EPSS Score | The finding's EPSS (Exploit Prediction Scoring System) probability. | Supports greater than, less than, or a range (0.0–1.0) |
Exploitable | Whether the finding is marked exploitable. | Supports Exploitable, Not Exploitable |
External Ticket Status | The status of the finding's linked external ticket. | Supports is one of for a text field |
Finding Package | The software package associated with the finding. | Supports is one of for a text field |
Finding Package Fix Versions | Text contained in the package fix version(s) for the finding. | Supports contains for a text field |
Finding Package Version | Text contained in the package version for the finding. | Supports contains for a text field |
Last Seen Date | Number of days since the finding was last seen. Supports less than or greater than. | Supports less than, greater than for a number of days |
Microsoft Patch Date | Number of days since the finding's Microsoft patch was released. Supports greater than or less than. | Supports less than, greater than for a number of days |
Microsoft Patch Tuesday | Whether the vulnerability was addressed in a Microsoft Patch Tuesday release. | Yes, No |
Name | A search field where you can search for strings in the name of the vulnerability for additional granular triggering | Freeform text field. Examples: Microsoft, Adobe, Apache, Oracle |
Nucleus Actors | Threat actors associated with the vulnerability (Nucleus Insights). | Supports is any of, is all of, or is none of |
Nucleus Ease of Exploitation | Nucleus Insights ease-of-exploitation rating. | Supports is one of, is none of for Very Hard, Hard, Moderate, Easy, Very Easy |
Nucleus Exploitation Consequence | The consequence of exploitation per Nucleus Insights. | Supports is one of or is none of for Nucleus exploitation consequences (e.g., Code Execution, Privilege Escalation, Data Exfiltration) |
Nucleus Exploit Weaponized | Whether a weaponized exploit exists for the vulnerability (Nucleus Insights). | Yes, No |
Nucleus Exploited | Whether the vulnerability has been exploited (Nucleus Insights). | Yes, No |
Nucleus Exploited by Malware | Whether the vulnerability has been exploited by malware (Nucleus Insights). | Supports is (Yes/No), exists, or does not exist |
Nucleus Exploited by Ransomware | Whether the vulnerability has been exploited by ransomware (Nucleus Insights). | Yes, No |
Nucleus Fix Available | Whether a fix is available for the vulnerability (Nucleus Insights). | Yes, No |
Nucleus Impacts OT | Whether the vulnerability impacts operational technology (Nucleus Insights). | Yes, No |
Nucleus Likely to be Exploited | Whether the vulnerability is likely to be exploited (Nucleus Insights). | Yes, No |
Nucleus Malware | Malware associated with the vulnerability (Nucleus Insights). | Supports exists, does not exist, is any of, is all of, or is none of for a text field |
Nucleus Media Mentions (180 Days) | Number of media mentions of the vulnerability in the last 180 days. | Supports greater than, less than, or equals for a number of mentions |
Nucleus Media Mentions (30 Days) | Number of media mentions of the vulnerability in the last 30 days. | Supports greater than, less than, or equals for a number of mentions |
Nucleus Media Mentions (90 Days) | Number of media mentions of the vulnerability in the last 90 days. | Supports greater than, less than, or equals for a number of mentions |
Nucleus Media Mentions (All Time) | Total number of media mentions of the vulnerability. Supports greater than, less than, or equals. | Supports greater than, less than, or equals for a number of mentions |
Nucleus Mitigation Available | Whether a mitigation is available for the vulnerability (Nucleus Insights). | Yes, No |
Nucleus Patch Available | Whether a patch is available for the vulnerability (Nucleus Insights). | Yes, No |
Nucleus Private Exploit Available | Whether a private exploit is available for the vulnerability (Nucleus Insights). | Yes, No |
Nucleus Public Exploit Available | Whether a public exploit is available for the vulnerability (Nucleus Insights). | Yes, No |
Nucleus Remote Exploitation | Whether the vulnerability can be exploited remotely (Nucleus Insights). | Yes, No |
Nucleus Risk Score | The Nucleus risk score for the finding. | Supports greater than, less than, equals and range for a numeric value (1-1000) |
Nucleus Threat Rating | The Nucleus threat rating | Supports is one of, is none of, exists, or does not exist for Existential, Critical, High, Medium, Low |
Nucleus Widely Exploited | Whether the vulnerability is widely exploited (Nucleus Insights). | Yes, No |
Nucleus Zero Day | Whether the vulnerability is currently a zero-day (Nucleus Insights). | Yes, No |
Nucleus Zero Day Previously | Whether the vulnerability was previously a zero-day (Nucleus Insights). | Yes, No |
Output | Text contained in the first 1000 characters of the finding output. Available when workflow output is enabled. | Supports contains or does not contain for free form text. Specify a specific phrase, or key word that the finding output contains or does not contain up to the first 1000 characters. |
Path | Text contained in the finding path. | Supports contains for free form text |
Port | The port associated with the finding. | Supports is or is not for free form text (e.g. 443); use * as a wildcard |
References | Text contained in the finding's references. Available when finding references automation is enabled. | Supports contains |
Result | The compliance result of the finding. | Supports is one of for Passed, Failed, Warning |
Severity - Current | The finding's current severity | Supports is one of for Critical, High, Medium, Low, Informational |
Severity - Original | The finding's original severity. Supports is one of. | Supports is one of for Critical, High, Medium, Low, Informational |
Solution | Text contained in the finding solution/recommendation. | Supports contains for free form text |
Source | The scan source/tool that produced the finding. | Supports is one of for free form text |
Status | The finding's status. | Supports is one of for Active and Resolved statuses |
Vulnerability Type | The vulnerability type. | Supports is any of, is none of, or does not exist for OS, Application, Hardware |
NOTE:
If your organization has one or more custom threat intelligence feeds configured, each field from those feeds is automatically added as additional finding conditions. These appear alongside the built-in conditions in the list above
The following screen shot shows an example of the CISA KEV Vulnerability condition being used to check and see if a vulnerability instance is on the CISA KEV list:
Asset Criteria
Asset criteria enable you to specify the conditions on the assets that activate the rule. You can set rules to match asset model-specific information (e.g. name, IP, group, type), asset metadata attributes (business owner, business owner team, etc.), and asset additional metadata ingested from your asset inventory tools into Nucleus.
When you finish entering the rule information, click the Next button to go to Step 2.
Step 2 - Rule actions
.png)
Clarification
An important difference between actions on finding instances and finding attributes is that instances affect specific instances of findings while attributes affect whole unique findings. An example use of a unique finding action would be to automatically mark an instance of a finding as exploitable if the Recorded Future risk score is above a 65.
With Finding Processing Rules, you can choose from a wide set of actions to perform once a finding's instances and attributes are ingested into Nucleus. For example, Finding Processing Rules make it fast and easy to set due dates on findings using the security policies in your organisation. Finding Processing Rules improve workflow efficiency as shown below.
Finding Instances
Set the due date of a finding.

Specify the due date:
Your new finding processing rule now appears in the Automation > Finding Processing list. Use the search to easily find your new processing rule as shown below:
.png)
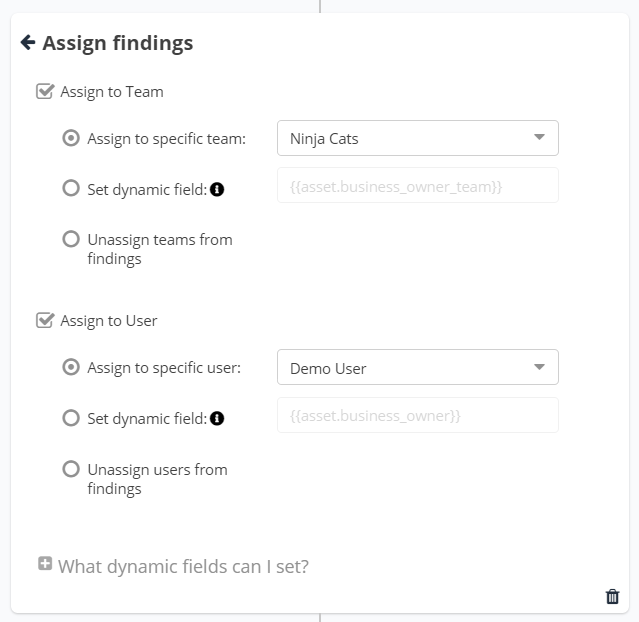
Assign a finding to a user and/or a team.
Change the finding’s status (e.g. if you want to always mark a finding as False Positive or Risk Accepted).
Comment on the finding.
Finding Attributes
Set the finding as exploitable/not exploitable.
Pin select vulnerabilities to the top of the Active Vulnerabilities page.
Set a different severity on the finding.
You can include all of the above actions into a single rule in order to orchestrate many outcomes based on the same criteria. Simply create a new rule, choose the finding and asset criteria, and add action cards with the + add button to your heart’s content!
Finding Processing Rules can be particularly useful for actions that are specific to your organisational context, such as normalising severities based on your internal triage framework, assigning findings to teams and users based on names and underlying assets, or setting SLA due dates accordingly to organisational security policies.
When you've finished adding action cards, click the Save & Finish button.
Select Behavior
.png)
These options control which finding instances a Set Finding Status action is allowed to overwrite, based on how that finding's current status was last assigned
Overwrite "Active" statuses set by scans
Applies the new status to findings whose current status is Active and was set automatically during scan ingestion. This is the most common behavior. Use it when you want the rule to act on newly discovered or re-confirmed findings that have not yet been reviewed or triaged.
Example: A scan ingests a finding and assigns it Active. This rule will overwrite that with the configured status (e.g., Accepted Risk).
Overwrite non-Active statuses set by scans (e.g., Potential)
Applies the new status to findings whose current status was set by a scan to something other than Active — for example, Potential. Some scan connectors assign intermediate statuses to findings that are detected but not yet fully confirmed. Enable this if you want the rule to also act on those findings.
Example: A scan assigns a finding the status Potential. With this option enabled, the rule will overwrite it with the configured status.
Overwrite statuses set by workflow (disabled by default)
Applies the new status to findings whose current status was previously set by an automation workflow or processing rule. By default, one workflow will not overwrite another's changes. Enable this only if you want this rule to take deliberate precedence over prior workflow-assigned statuses.
Example: A prior workflow set a finding to In Progress. This rule will overwrite it with the configured status.
⚠️ Use with caution — enabling this across multiple rules can cause conflicts where rules overwrite each other unpredictably.
Overwrite statuses manually set by user (disabled by default)
Applies the new status to findings whose current status was manually set by a user through the interface. Manual changes represent deliberate, human-reviewed decisions. This option is off by default to protect those decisions from being automatically overridden.
Example: An analyst manually set a finding to Exception Requested. Enabling this allows the rule to overwrite that decision.
⚠️ Use with caution — only enable this for high-confidence rules where automation should take precedence over analyst input.
If you have any questions, please contact us through the support center.