If you are planning on enabling SSO for your Nucleus account, let your Nucleus account rep know so they can send you the relevant information required for setup on the Azure AD side. If you are setting up token encryption, inform your Nucleus support representative.
Overview
The below steps will allow you to configure single sign-on with your Azure Active Directory Paid version. This is the recommended way of setting up your Azure AD for SSO with Nucleus.
This will allow you to enable your users to automatically sign-in to Nucleus for their Nucleus accounts. You'll also be able to control in your Active Directory who has access to Nucleus.
Nucleus has two options for setting up your Azure AD based on groups or based on roles. Choose the option below based on which pertains to your organization:
- Setting up Azure AD with Groups
- Setting up Azure AD for Roles
Nucleus allows you to assign Nucleus roles based on a user's role or group in Azure AD so you can manage your user access from Azure. See 'Map SSO Roles' for the setup instructions for these advanced features.
You'll need an Azure AD subscription to follow the steps below. Note that these screenshots pertain to the newest Azure Portal.
Option 1: Setting up Azure AD with Groups
Log into your office console and complete the following steps:
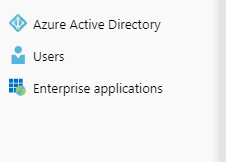
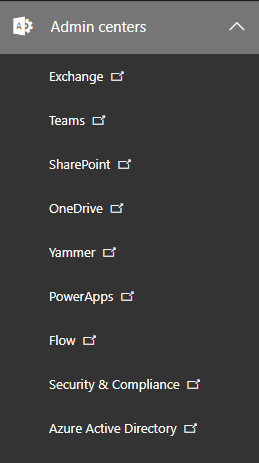
- Click Azure Active Directory on the left side of the console, in the left-hand navigation menu.

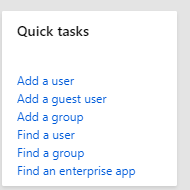
- Click Enterprise Applications in the left-hand navbar OR click Find an enterprise app on the dashboard.
OR

-
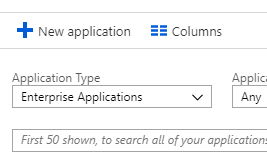
Click + New Application.
-
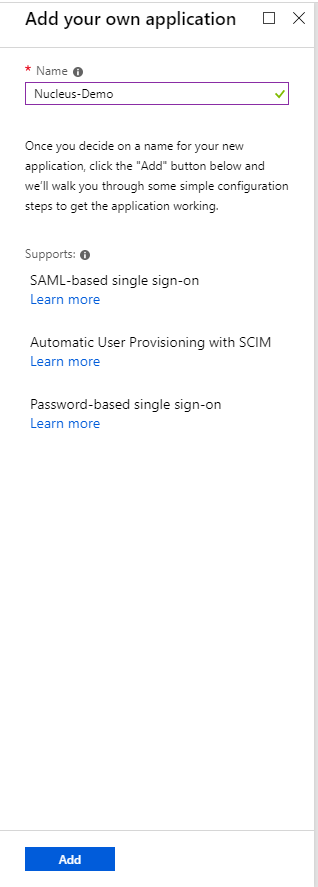
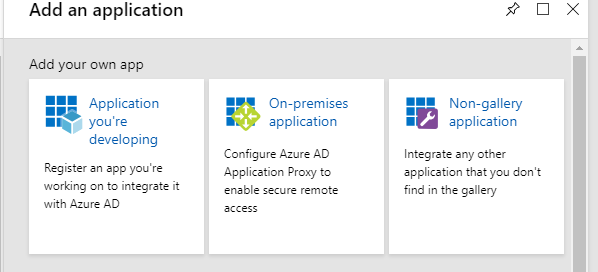
On the "Add an application" page, click Non-gallery application.

- On the following page, enter in the following information, then click Add:
Name: A name to differentiate the application in your Azure.
-
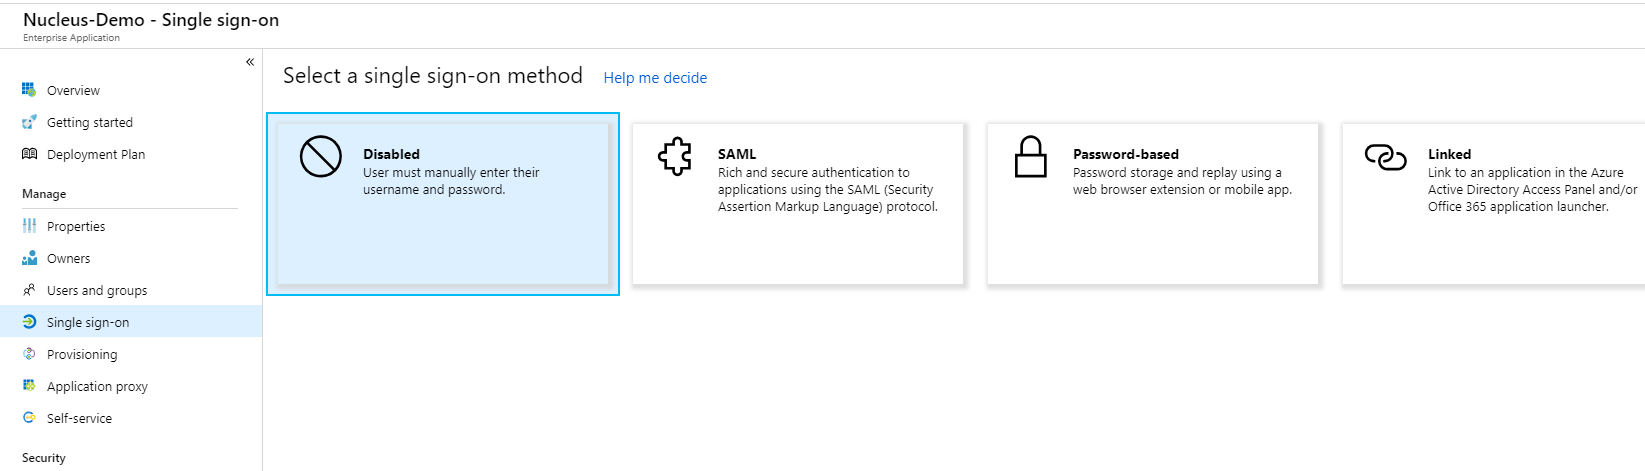
On the following page, click Single sign-on in the lefthand navigation menu.
-
Click on SAML.
-
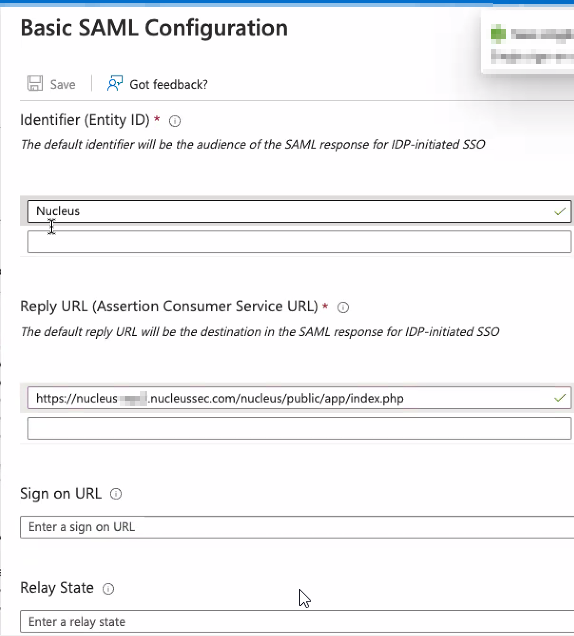
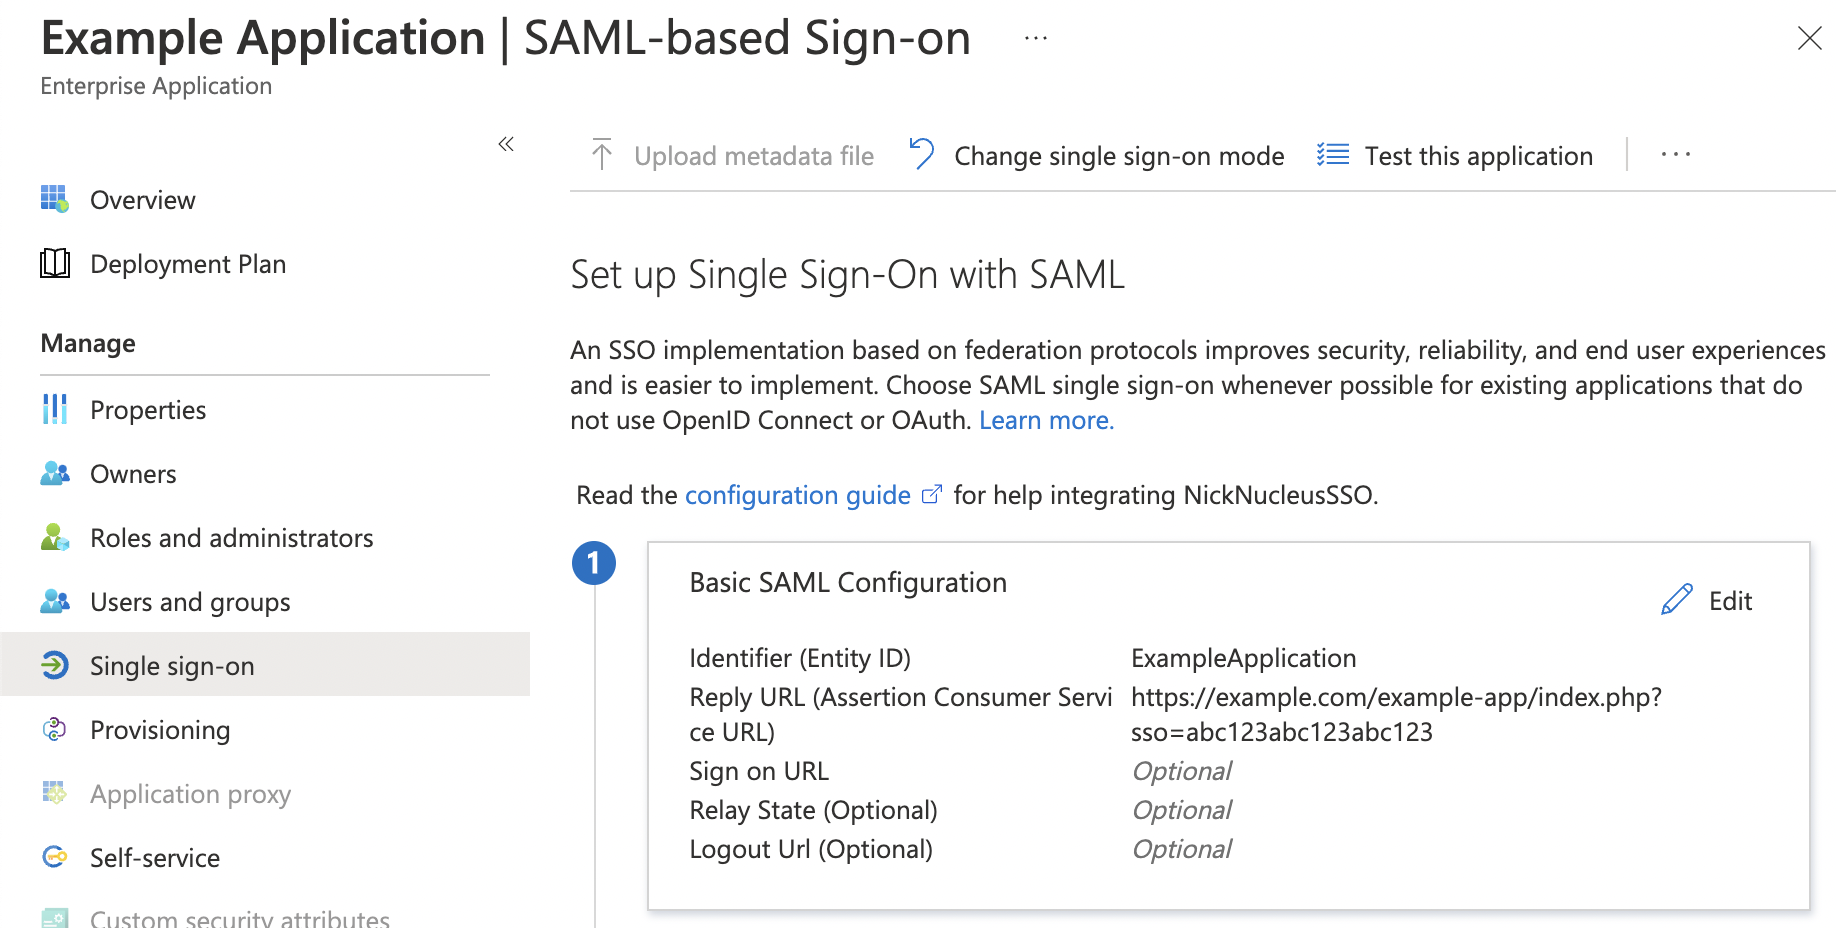
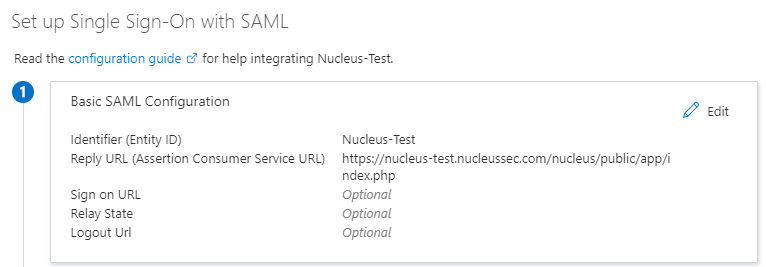
On the following page, enter in the following information, then click Save:
| Field | Info |
|---|---|
| Identifier (Entity ID) | This is going to be the name that AD uses to direct Nucleus login requests to the proper application |
| Reply URL | This is the url that you were given by your Nucleus support representative which is specific to your Nucleus instance. If you have not yet received this URL, please send an email to [email protected]. |

-
Once you have saved the Basic SAML Configuration, scroll down the page until you get to Section 3, SAML SIGNING CERTIFICATE
-
Do the following in this section (Section 3):
- Copy the Thumbprint: You will need to send this to your nucleus support representative
- Download the Certificate(Base64): You will need to send this to your Nucleus representative
- Once you have copied/downloaded the info from step 12, scroll down even further to the Set up Application Name and copy the following
- Copy the Login URL: You will need to send this to your Nucleus representative
- Copy the Azure AD Identifier: You will need to send this to your Nucleus support representative
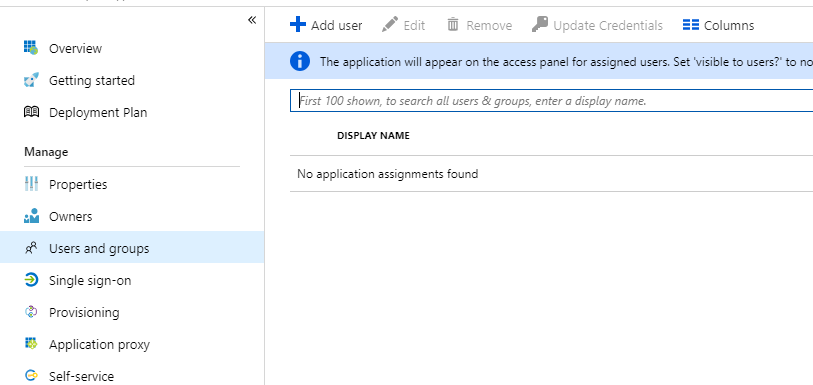
- Once you have all of the above, navigate to Users and Groups on the left-hand navbar:

-
Click + Add user
-
Add as many users or groups to the application as you would like.
These users will all be able to log into Nucleus.
- Once you have added your users to the application, collect all your information which you need to send to your Nucleus representative to complete the SSO setup for you. You will need the following, which can all be found in the Single sign-on tab in the lefthand navbar:

- SSO Domain: The domain that user accounts belong to, usually the part after the @ sign.
- Identifier (Entity ID): Needs to be copied
- Thumbprint: Needs to be copied
- Certificate(Base64): Needs to be downloaded
- Login URL: Needs to be copied
- Azure AD Identifier: Needs to be copied
- If you are using token encryption: Affects how your Nucleus representative set ups SSO for you.
Any domains provided to Nucleus as part of the Entra ID setup process should be case insensitive. For example please use mydomain.com, not Mydomain.com
-
(For Azure Group Mapping) If you would like to use Azure AD groups to assign and manage Nucleus roles, use the following instructions:
- Navigate to All Services, then App registrations.
- Select the application you just created, then click the Manifest button.
- In the resulting Edit manifest page, modify the "groupMembershipClaims" field to read: "ApplicationGroup". Then click Save. In the manifest this will appear as:
"groupMembershipClaims": "ApplicationGroup",
If the number of groups assigned to users is not huge (under 50), following value can also be used:
"groupMembershipClaims": "All",
-
Once you send this info to your Nucleus representative, your SSO setup should be completed within 24 hours by a Nucleus support rep, who will respond to you via email confirming that SSO is complete.
-
If you are using token encryption, you will also need to set up encryption within Azure AD:
- Request the
.cercertificate file and SSO URL for token encryption from your Nucleus representative. - Log into Azure AD and navigate to your application.
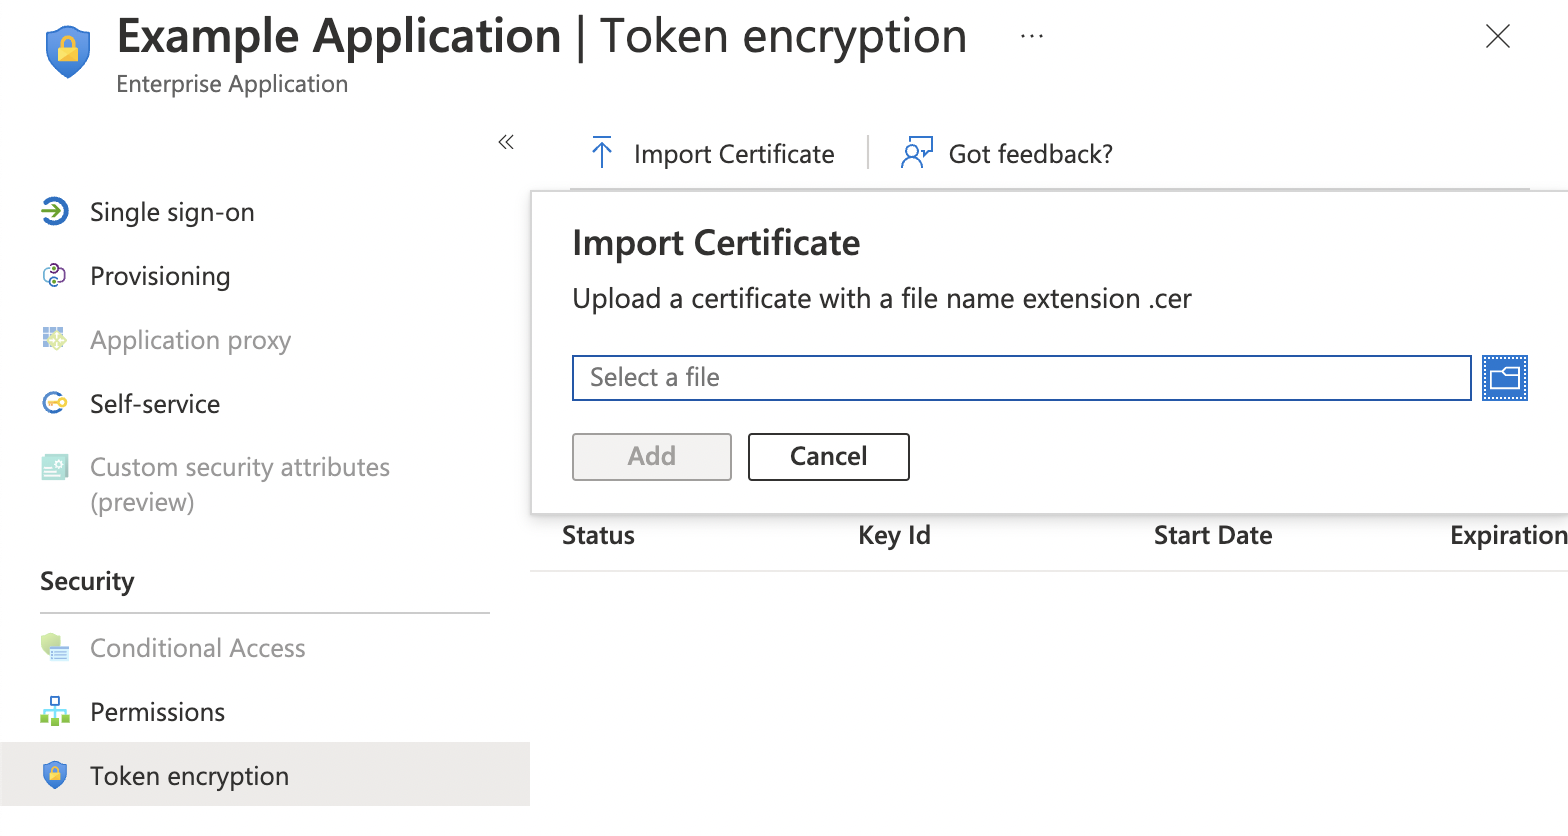
- In the navigation bar on the left, under Security, select Token encryption.
- Click Import Certificate.
- Select the
.cercertificate file provided by your Nucleus representative. - Click Add.
- Click the button with three dots ("...") to the far right of the certificate in the list of certificates.
- From the menu, select Activate token encryption certificate.
- In the navigation bar on the left, under Manage, select Single sign-on.
- Under Basic SAML Configuration, confirm the Reply URL (Assertion Consumer Service URL) includes the parameter "
?sso=", which is required for token encryption. If the URL doesn't contain that parameter:- Click the Edit button.
- In the Reply URL (Assertion Consumer Service URL) field, enter the new URL provided by your Nucleus representative in step a.
- Click Save at the top.
- Request the
Option 2: Setting up Azure AD for Roles
Log into your Office Admin console and complete the following steps:
- Click Azure Active Directory on the left side of the console, in the left-hand navigation menu.
- Click Enterprise Applications in the left-hand navbar OR click Find an enterprise app on the dashboard.

OR
- Click + New Application.
- On the "Add an application" page, click Non-gallery application.
- On the following page, enter in the following information, then click Add:
Name: A name to differentiate the application in your Azure.

- On the following page, click Single sign-on in the lefthand navigation menu.
-
Click on SAML.
-
On the following page, enter in the following information, then click Save:
| Field | Info |
|---|---|
| Identifier (Entity ID) | This is going to be the name that AD uses to direct Nucleus login requests to the proper application |
| Reply URL | This is the url that you were given by your Nucleus support representative which is specific to your Nucleus instance. If you have not yet received this URL, please send an email to [email protected]. |

-
If you would like to use Azure AD roles to assign Nucleus roles, use the following instructions:
-
Navigate to All Services, then App registrations.
-
Select the application you just created, then click the Manifest button.
-
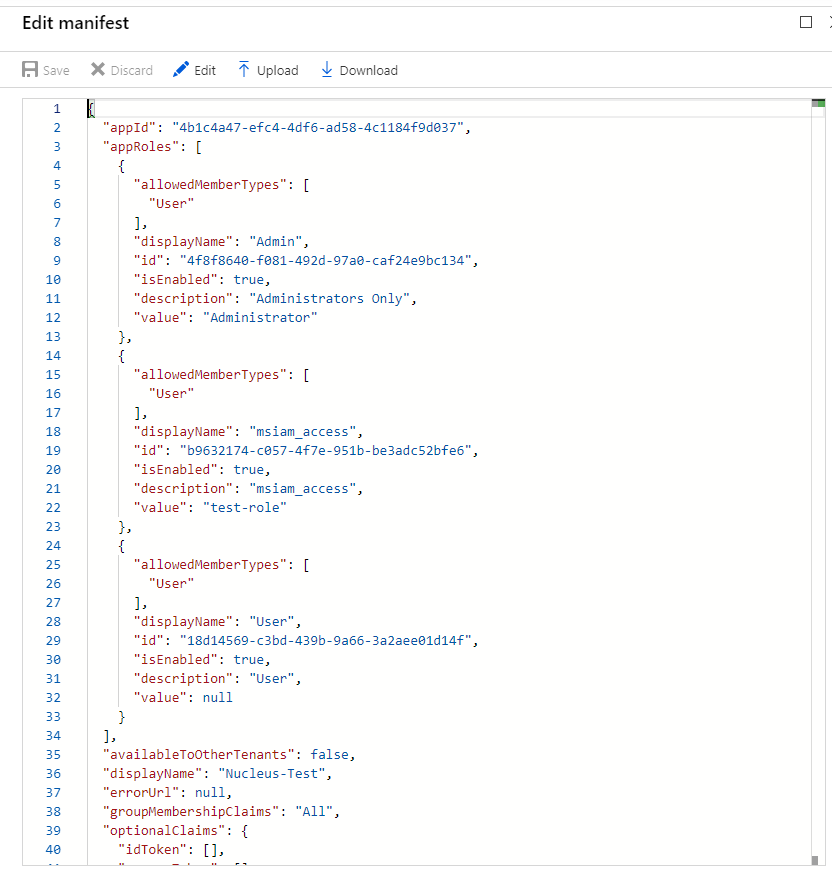
In the resulting Edit manifest page, modify the "groupMembershipClaims" field to read: "All". Then click Save.
-
Create your roles in the manifest for the enterprise app you just created using the following resource, (section 6h): https://docs.microsoft.com/en-us/azure/active-directory/develop/active-directory-enterprise-app-role-management
- Once you have completed section h, please click Save on the manifest.
- Close the Microsoft Help Center Article
An example manifest is shown here (Admin is the role which we created):
-
Once you have successfully created the roles for the enterprise application, navigate to Enterprise Applications > Nucleus Application you just created > Single Sign-on, then scroll down the page until you get to Section 2, User Attributes & Claims.
-
Click on the edit (pencil) icon in Section 2, User Attributes & Claims.
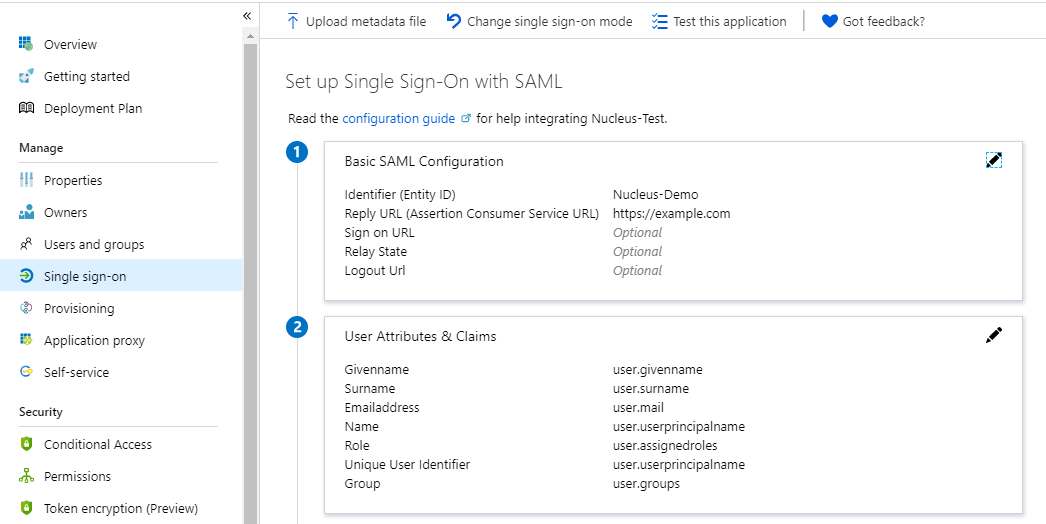
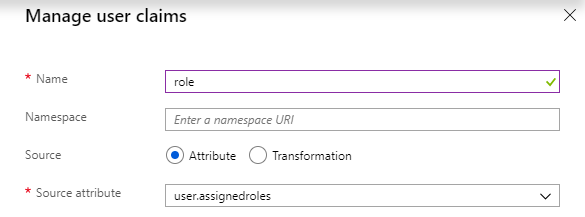
- Click Add new claim, then enter the following information, and click Save:
- Name: role
- Source attribute: user.assignedroles
-
Once you have saved the Basic SAML Configuration, scroll down the page until you get to Section 3, SAML SIGNING CERTIFICATE
-
Do the following in this section:
- Copy the Thumbprint: You will need to send this to your nucleus support representative
- Download the Certificate(Base64): You will need to send this to your Nucleus representative
- Once you have copied/downloaded the info from step 12, scroll down even further to the Set up Application Name and copy the following:
- Copy the Login URL: You will need to send this to your Nucleus representative
- Copy the Azure AD Identifier: You will need to send this to your Nucleus support representative
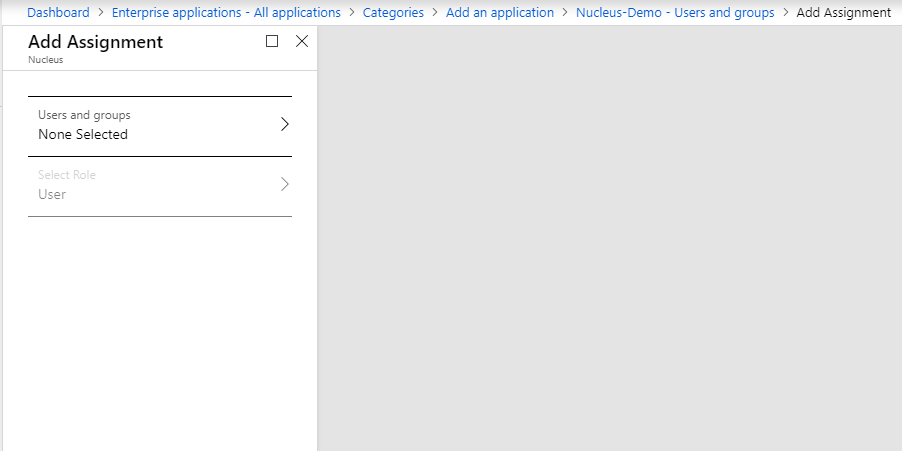
- Once you have all of the above, navigate to Users and Groups on the left-hand navbar:
-
Click + Add user
-
Add as many users or groups to the application as you would like.
These users will all be able to log into Nucleus.
Select the roles for each user that you created in step 9. You can assign each group or user a role in the application from this screen. For the example we gave in step 9, you could assign a user the "Admin" role, which will be passed in the SAML response to Nucleus.
- Once you have added your users to the application, collect all your information which you need to send to your Nucleus representative to complete the SSO setup for you. You will need the following, which can all be found in the Single sign-on tab in the lefthand navbar:
- Identifier (Entity ID): Needs to be copied
- Thumbprint: Needs to be copied
- Certificate(Base64): Needs to be downloaded
- Login URL: Needs to be copied
- Azure AD Identifier: Needs to be copied
-
- If you are using token encryption: Affects how your Nucleus representative set ups SSO for you.
-
Once you send this info to your Nucleus representative, your SSO setup should be completed within 24 hours by a Nucleus support rep, who will respond to you via email confirming that SSO is complete.
-
If you are using token encryption, you will also need to set up encryption within Azure AD:
- Request the
.cercertificate file and SSO URL for token encryption from your Nucleus representative. - Log into Azure AD and navigate to your application.
- In the navigation bar on the left, under Security, select Token encryption.
- Click Import Certificate.
- Select the
.cercertificate file provided by your Nucleus representative. - Click Add.
- Click the button with three dots ("...") to the far right of the certificate in the list of certificates.
- From the menu, select Activate token encryption certificate.
- In the navigation bar on the left, under Manage, select Single sign-on.
- Under Basic SAML Configuration, confirm the Reply URL (Assertion Consumer Service URL) includes the parameter "
?sso=", which is required for token encryption. If the URL doesn't contain that parameter:- Click the Edit button.
- In the Reply URL (Assertion Consumer Service URL) field, enter the new URL provided by your Nucleus representative in step a.
- Click Save at the top.
- Request the
If you used AD groups or roles within your SSO setup, please refer to the SSO Mapping Page for instructions on how to map your user groups and roles from AD to Nucleus.