Operations Overview

Prev Next

Overview

The Operations Overview is the primary operational dashboard for your vulnerability management program in Nucleus. It brings together data from your connected security tools, normalizes that data across assets and findings, and presents a current view of:

  • Your overall risk posture

  • The size and composition of your vulnerability backlog

  • Vulnerabilities with evidence of real-world exploitation

  • The assets and findings creating the most risk

  • Remediation speed and SLA performance

  • Changes in exposure over time

Use this page as the starting point for regular vulnerability reviews, operational check-ins, and initial investigation. It helps answer three fundamental questions:

  1. Where are we most exposed right now?

  2. Are we working on the right vulnerabilities and assets?

  3. Is our vulnerability management program improving?

The Operations Overview is especially useful after you begin ingesting data into Nucleus. It helps you establish a baseline, identify visibility gaps, and move from collecting scanner results to making risk-informed remediation decisions.

Accessing the Operations Overview

From within a Nucleus project, navigate to:

Analyze > Operations Overview

The dashboard reflects the currently selected project and any asset filters applied at the top of the page.

Filter the Dashboard

Use the Asset Filters control to limit the dashboard to a specific portion of your environment, such as:

  • A business unit

  • An application or technology group

  • Production assets

  • Internet-facing assets

  • Assets owned by a particular team

  • Assets with a particular criticality or tag

Asset filtering allows the same dashboard to support both enterprise-wide reviews and focused operational discussions. For example, you can compare the overall program with the risk posture of a specific business unit or remediation team.

For more information, see Asset Filtering.

Understand Your Current Risk Posture

Overall Risk Score

The Overall Risk Score provides a high-level indicator of the risk represented by the vulnerabilities and assets currently included in the dashboard.

Nucleus risk scoring combines technical vulnerability information with available asset and business context. This helps teams move beyond raw severity or CVSS and account for factors such as exploitability, business criticality, data sensitivity, public exposure, and compliance scope.

Use the Overall Risk Score to:

  • Establish a baseline for the selected environment

  • Compare risk between filtered asset populations

  • Monitor whether remediation is reducing risk

  • Identify unexpected changes that require investigation

The score should be interpreted with the supporting metrics and trends on the page. A single score summarizes posture, while the remaining widgets help explain what is driving it.

For more information, see Nucleus Risk Score.

Custom Risk Score

If your organization has configured a Custom Risk Score, the dashboard displays the resulting score using your organization’s risk model.

Custom risk models can incorporate your own scoring scale, risk levels, business rules, threat intelligence, and prioritization criteria. This allows the Operations Overview to reflect how your organization defines risk—not just a generic industry model.

Use the standard and custom risk views to validate that your configured model is elevating the vulnerabilities and assets your organization considers most important.

For more information, see Custom Risk Score.

Monitor Program Performance

The Program Metrics section summarizes whether remediation work is happening quickly enough and in accordance with your vulnerability management policies.

Depending on your configuration, this section can include:

Metric

What it tells you

Critical SLA Pass %

The percentage of applicable critical findings remediated within the configured SLA

Critical Remediation Velocity

How long it is taking the organization to remediate critical findings

Critical Average Age

The average age of currently active critical findings

Number of Assets

The number of assets included in the current project and asset-filter scope

These metrics help distinguish between the size of the backlog and the effectiveness of the program managing it. For example, a large backlog may be manageable if high-risk findings are being resolved quickly, while an aging critical backlog may indicate stalled remediation or unclear ownership.

Identify High-Risk and Exploitable Exposure

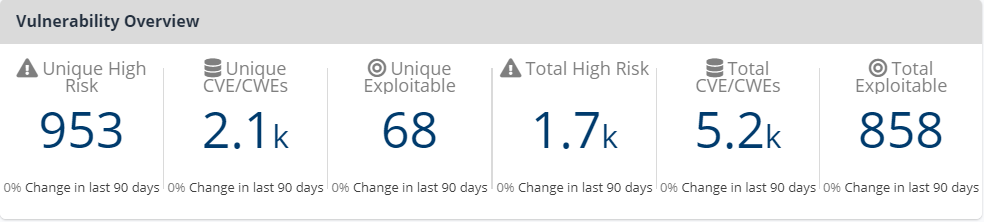
The risk summary cards provide an immediate view of the findings that deserve additional attention.

Unique High Risks

The number of distinct high-risk vulnerabilities present in the selected environment.

A vulnerability affecting many assets is generally counted once in this metric. Use it to understand the variety of high-risk vulnerability conditions in your environment.

Total High Risks

The total number of high-risk finding instances across affected assets.

Because the same vulnerability can affect many assets, this number may be significantly larger than Unique High Risks. Use it to understand the operational scale of the high-risk remediation backlog.

Exploitable Vulnerabilities

The number of finding instances identified as exploitable based on scanner data, Nucleus enrichment, or analyst-provided information.

This metric helps separate vulnerabilities that are theoretically severe from those for which exploitation may be practical.

Existential Threat Vulnerabilities

The number of findings associated with vulnerabilities rated Existential by the Nucleus Threat Rating.

Existential vulnerabilities represent rare, immediate, and potentially organization-wide threats. They may involve active exploitation, limited mitigations, and broad impact across critical systems. These vulnerabilities should generally be treated as incident-response priorities.

Exploited by Malware

The number of findings associated with vulnerabilities known to be exploited by malware or ransomware.

This is one of the strongest threat-informed prioritization signals on the dashboard. Review these findings alongside asset criticality, exposure, available fixes, and existing compensating controls.

For more information about these enrichment fields, see Nucleus Insights and Threat Rating.

Understand Where Vulnerabilities Are Coming From

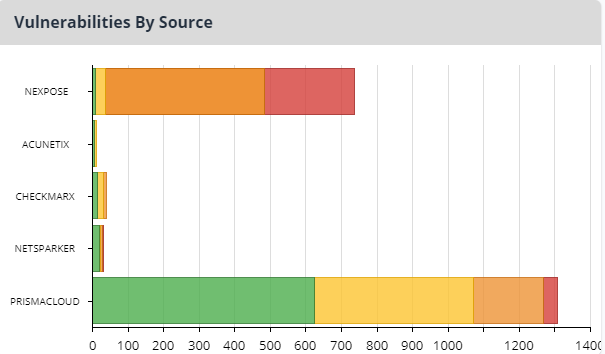
Vulnerabilities by Severity

The Vulnerabilities by Severity chart shows the distribution of active vulnerabilities by severity and source.

Use this chart to:

  • Understand which tools contribute the most findings

  • Compare the types of exposure detected by different tools

  • Identify unexpected differences in coverage

  • Find sources contributing unusually large volumes of critical or high findings

  • Validate that expected data sources are reporting into Nucleus

Scanner volume alone does not measure scanner effectiveness. Differences may reflect the technologies being assessed, asset coverage, scan frequency, or the types of testing performed by each source.

Monitor Exposure Over Time

Vulnerabilities Over Time

The Vulnerabilities Over Time chart shows how the active vulnerability backlog has changed by severity.

Select a time range, such as 7, 30, 60, or 90 days, to evaluate recent movement or longer-term patterns.

Use this chart to identify:

  • Whether critical and high findings are increasing or decreasing

  • Sudden increases caused by new scans, assets, or vulnerability disclosures

  • Backlogs that remain flat despite remediation activity

  • Whether remediation is keeping pace with newly discovered exposure

A rising count does not always indicate declining program performance. It may result from improved scan coverage, newly onboarded assets, or additional security tools. Review the chart alongside asset counts, scan sources, and remediation metrics.

Investigate the Highest-Risk Findings

Top Risks

The Top Risks table identifies the individual vulnerability instances presenting the greatest risk based on the applicable Nucleus or Custom Risk Score.

Each entry associates a vulnerability with a specific affected asset and source. This distinction is important: vulnerability risk becomes operational when a particular vulnerability exists on a particular asset.

Use this table to:

  • Begin daily or weekly triage

  • Validate that risk scoring matches analyst expectations

  • Identify findings requiring immediate investigation

  • Review the asset and scanner source associated with each risk

  • Determine which findings should enter remediation workflows

For deeper analysis and remediation management, continue to the Active Vulnerabilities or Top Risks views.

Locate Concentrations of Asset Risk

Most Risky Assets

The Most Risky Assets table identifies assets with the greatest concentration of vulnerability risk. It includes finding counts by severity and the asset’s most recent scan date.

Use this table to identify:

  • Critical systems carrying large vulnerability backlogs

  • Assets with unusually high concentrations of critical or high findings

  • Potential remediation hotspots

  • Assets that may have stale scan data

  • Systems that require additional ownership or business context

An asset with many findings is not automatically the most important asset to remediate. Consider its business criticality, exposure, threat intelligence, ownership, and available fixes when determining the appropriate response.

Track SLA Performance

SLA Compliance Trend

The SLA Compliance Trend shows how compliance with configured vulnerability remediation deadlines changes over time.

Use this chart to determine:

  • Whether teams are consistently meeting remediation policy

  • Whether SLA performance is improving

  • When compliance began to decline

  • Whether operational or staffing changes affected remediation

  • Which asset populations require a more focused review

Apply asset filters to compare SLA performance across business units, applications, environments, or remediation teams.


The Operations Overview is designed to support a repeatable review process:

  1. Confirm scope. Select the appropriate project and asset filter.

  2. Review posture. Check the Overall Risk Score and program metrics for unexpected changes.

  3. Look for urgent threats. Review exploitable, Existential, and malware-exploited vulnerabilities.

  4. Identify concentration. Examine the highest-risk findings, riskiest assets, and vulnerability sources.

  5. Evaluate progress. Review vulnerability and SLA trends to determine whether risk is being reduced.

  6. Investigate and act. Continue into detailed findings views to assign ownership, set due dates, create tickets, or initiate automation.

  7. Measure the outcome. Return to the dashboard during recurring reviews to confirm that remediation is improving risk and SLA performance.

This connects the Operations Overview to the broader Nucleus workflow: explore and understand your data, prioritize using threat and business context, automate repeatable decisions, route remediation work, and prove progress.

Operations Overview vs. Other Analytics Pages

The Operations Overview provides a standardized, immediate view of current program health. Use other Nucleus analytics capabilities when you need more specialized analysis:

  • Trends: Perform deeper analysis of remediation velocity, vulnerability age, and historical movement.

  • Dashboards: Build tailored views for particular stakeholders, teams, technologies, or compliance programs.

  • Metrics: Define business-aligned KPIs and compare performance across different asset groups.

  • Reports and Scheduled Reports: Distribute recurring operational or executive reporting.

The Operations Overview should be your first stop for understanding what is happening. These additional capabilities help explain why it is happening and communicate the results to others.

Next Steps

After reviewing the Operations Overview:

  • Use the detailed findings views to investigate and manage active risk.

  • Review Step 3 – Prioritize to develop a threat- and business-informed remediation strategy.

  • Use Automation to apply prioritization, ownership, and SLA decisions consistently.

  • Review Step 6 – Prove the Progress to build a repeatable program measurement and reporting process.