Overview
The Nucleus ServiceNow App connector integrates directly with ServiceNow through the Nucleus Security app found in the ServiceNow Store. It runs within your ServiceNow environment, providing flexible ticketing integration with ServiceNow Incidents or any other table that extends Task. The Nucleus ServiceNow App connector is ideal for advanced workflows or highly customized instances of ServiceNow.
The Nucleus Security ServiceNow app is highly configurable to suit your unique ServiceNow configuration and workflow requirements. It is intended to be installed and configured by a Nucleus Security specialist alongside a ServiceNow administrator, as an intimate knowledge of both ServiceNow and Nucleus is required to properly configure the app. Contact your Nucleus customer success representative to set up an onboarding call between yourself, Nucleus and one of your ServiceNow administrators.
Prerequisites
- Admin permission in your ServiceNow instance to install and configure the app.
- The ServiceNow App connector has been enabled for your Nucleus organization.
We strongly recommend you first complete this entire installation in a non-production Nucleus project (e.g., Sandbox project with sample data) and non-production ServiceNow environment (e.g., UAT instance) prior to configuring in production.
Install the Nucleus Security app in ServiceNow
- Navigate to the Nucleus Security app in the ServiceNow App Store.
- Click Get.
- Log in with your ServiceNow ID using admin permissions.
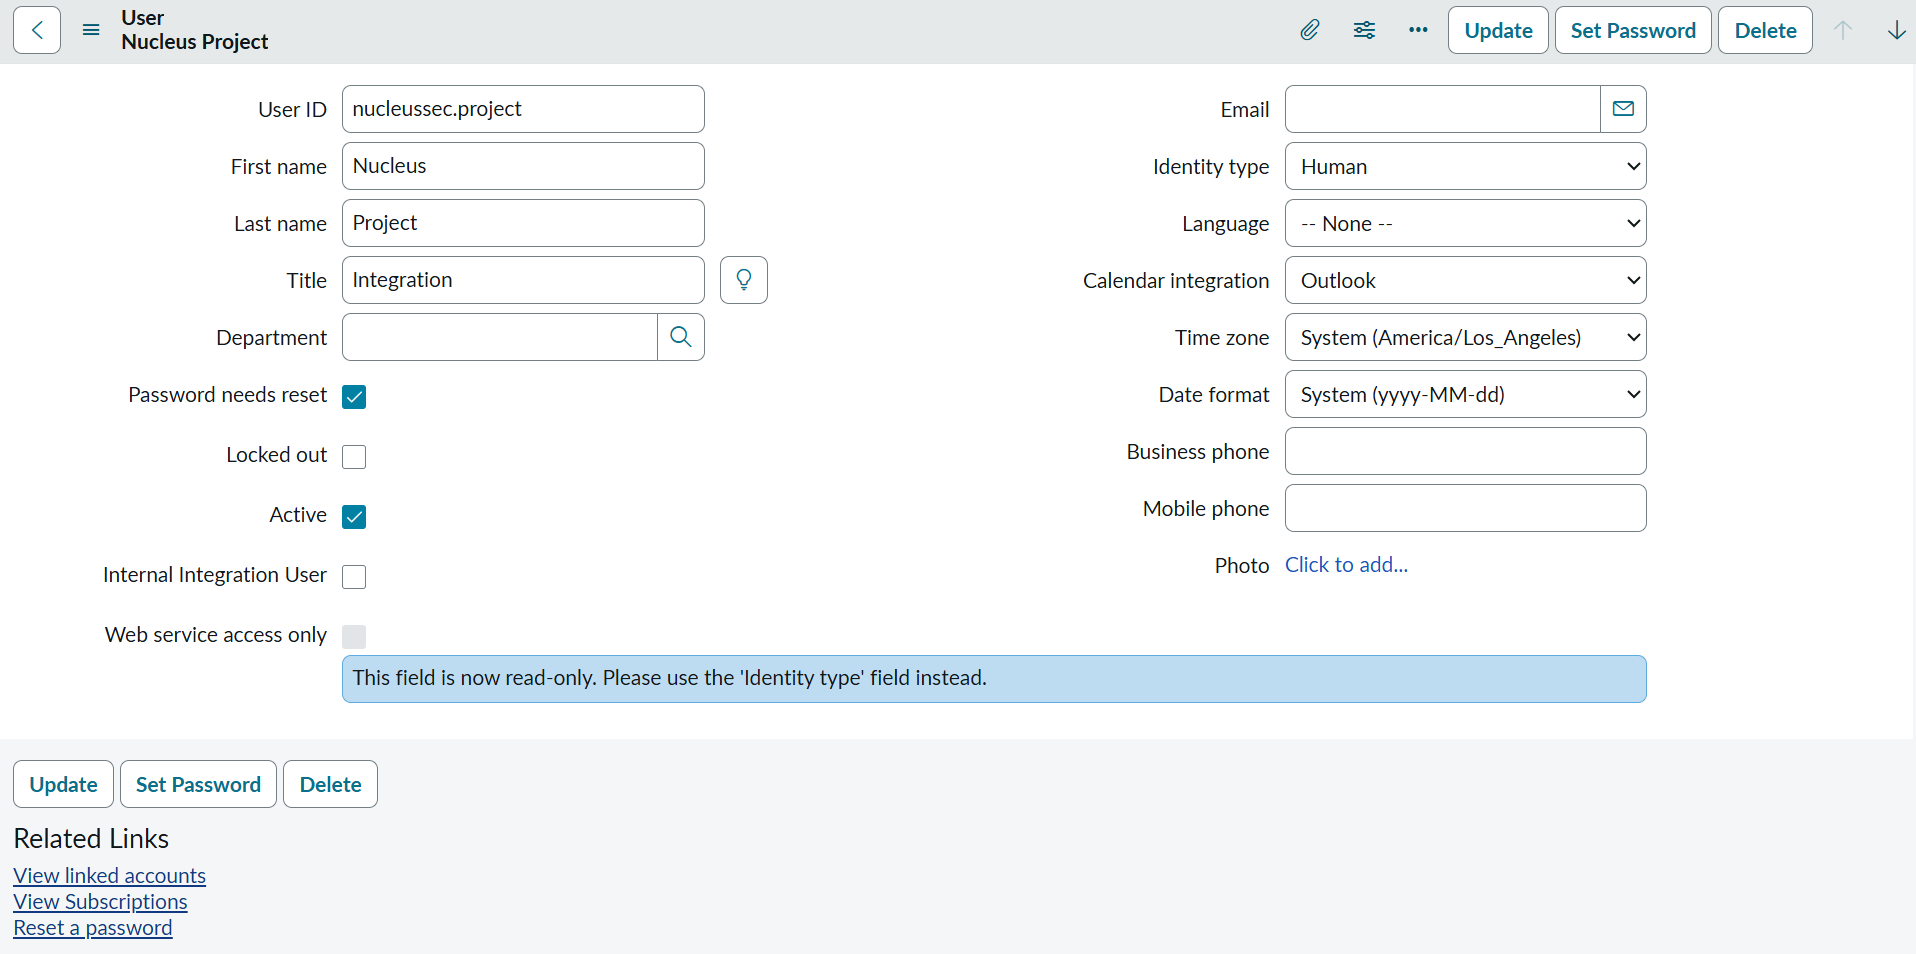
Create and configure the local integration user
-
Log in to your ServiceNow instance with admin permissions.
-
From the navigation bar on the left, under User Administration, select Users.
-
Click New.
-
In the User ID field, enter the username
nucleussec.projector any custom username of your choice. -
In the First Name field, enter any first name.
-
In the Last Name field, enter any last name.
-
Optionally, in the Title and Department fields, enter any values of your choice.
-
Click Submit.
-
From the list of users, select the new user you created.
-
Ensure Active is selected.
-
Click Set Password to assign a password for the integration user and make a note of it.
-
Confirm the Identity type is set to Human.
Note: In older versions, you may need to disable Web service access only instead.
-
Select the Roles tab.
-
Click Edit....
-
The nucleussec.project service account needs permissions outlined below:
- Read/write to incident table
- Read to sys_dictionary and sys_choice tables
- X_nucse_nucleus_sp.nucleus_mapping_user role
- X_nucse_nucleus_sp.nucleus_spoke_admin role
Each ServiceNow instance can be configured differently, but typically these are the roles required to grant read/write to incident and read to sys_dictionary and sys_choice. - sn_incident_read
- sn_incident_write
- cmdb_read
- asset
- task_editor
- itil
- x_nucse_nucleus_sp.nucleus_mapping_user
- x_nucse_nucleus_sp.nucleus_spoke_admin
-
Click Save.
-
From the navigation bar on the left, search "Nucleus". Under Nucleus Security, select Configuration Properties.
-
Under Enable Debug, optionally check Yes to enable full debug output.
NOTE: Due to the verbosity of debug output, only enable debug output in sub-production environments, unless directed to by Nucleus Support.
-
From the Logging Verbosity menu, select Debug, Informational, Warning, or Error.
NOTE: Ignore any properties labeled 'Deprecated'.
-
Note the Logging Destination field. Logging is written to the Application Log table (
db) by default. -
Click Save.
Set up the ServiceNow App connector in Nucleus
You can create one or more ServiceNow App connectors depending on the needs of your teams, workflows and SLA requirements. If tickets for all teams will be the same Ticket Type and configuration, then a single connector is all you will need. If you want to create different Ticket Types and/or configurations for different teams or types of vulnerabilities, you can configure multiple connectors to address your different Use Cases. Common examples for creating multiple connectors includes:
- Creating Incidents with short SLAs for the highest risk vulnerabilities, and creating Service Requests (Catalog Items) for lower risk vulnerabilities.
- Creating connections to different custom Task Tables created to meet the unique requirements across Teams such as differences in SLAs.
Follow the steps below to create a new ServiceNow App connector:
- Log in to your Nucleus project.
- From the navigation bar on the left, under Project Administration, select Connector Setup.
- Select ServiceNow App.
- In the Name field, enter a name for this connector.
- Optionally, in the Description field, enter a description for this connector.
- In the Instance URL field, enter the URL of your ServiceNow instance. Enter the base path only (e.g.,
https://my-instance.service-now.com). - Select the preferred authentication method: Basic Auth or OAuth2.
- Basic Auth:
- In the Username field, enter the username you chose when creating the user earlier.
- In the Password field, enter the password for that user.
- In the Shared Secret field, enter
nucleussecret, unless otherwise instructed by your Nucleus Security specialist.
- OAuth2:
- Log in to your ServiceNow instance admin permissions.
- From the navigation bar on the left, under System OAuth, select Application Registry.
- Click New.
- Click Create an OAuth API endpoint for external clients.
- In the Name field, enter a name.
- Ensure the Application is set to Nucleus Security.
- Click Submit.
- Click on the name of the new application registry you created.
- Copy the Client ID.
- Copy the Client Secret.
- Return to the Nucleus app.
- In the Username field, enter
nucleussec.project. If you chose a different username when creating the user earlier enter that username instead. - In the Password field, enter the password of the user you created earlier.
- In the Client ID field, enter the Client ID you copied from ServiceNow.
- In the Client Secret field, enter Client Secret you copied from ServiceNow.
- In the Username field, enter
- Log in to your ServiceNow instance admin permissions.
- Basic Auth:
- Click Connect To ServiceNow.
- Download the default mapping table for either DoubleIncident or SingleIncident configurations provided by a member of the Nucleus team.
- Click Save & Finish.
Verify the Nucleus Mapping table in ServiceNow
The Nucleus Mapping table is designed to accept requests for actions made by the Nucleus ServiceNow App connector and apply that action with the correct tables and field mappings in ServiceNow. The Nucleus Mapping Table is automatically generated when the ServiceNow App connector in Nucleus first connects to ServiceNow.
To verify that the Mapping table was created:
-
Log in to your ServiceNow instance with admin permissions.
-
From the All navigation mention, search for Nucleus Security, then select Field Mappings:
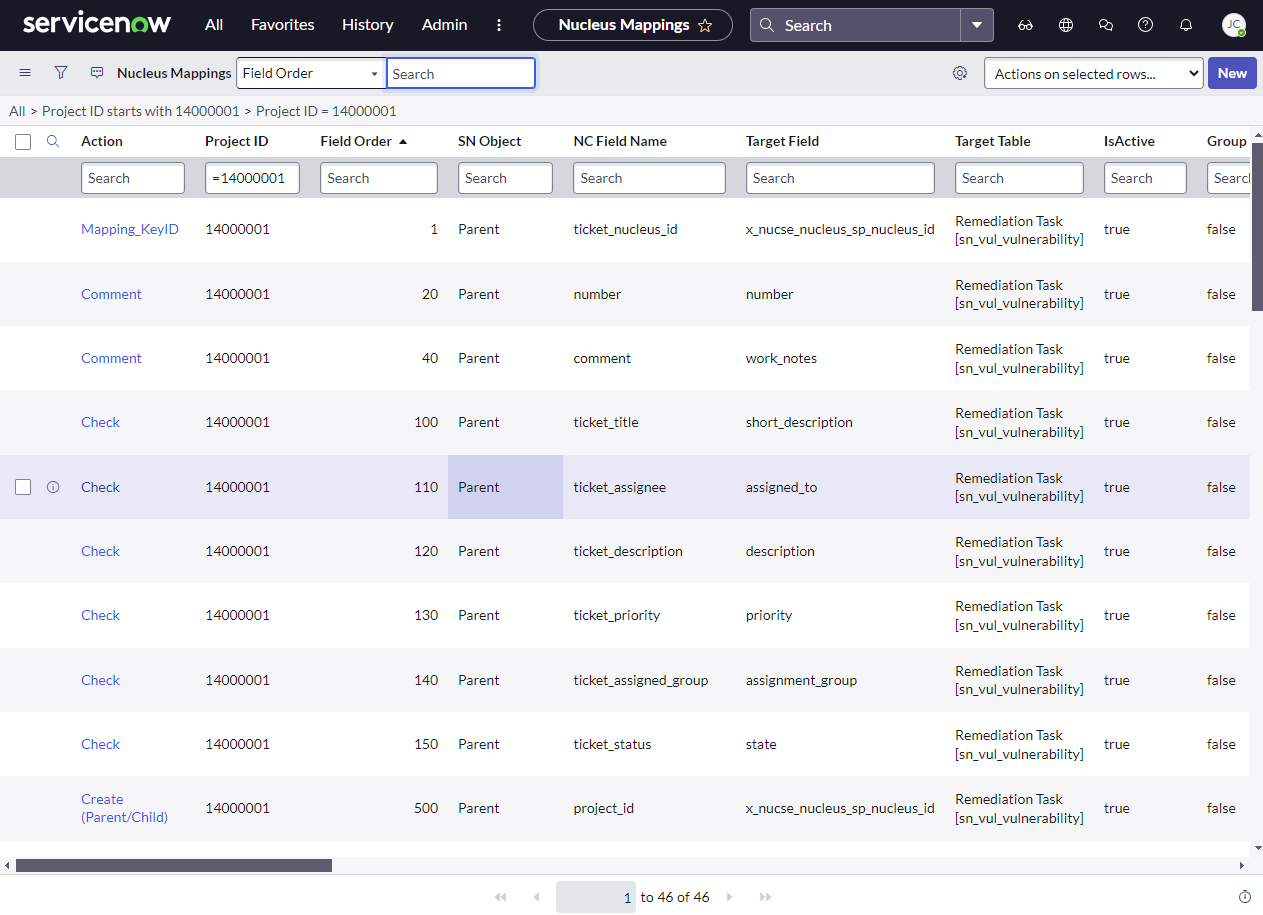
-
You should see a full set of default mappings that were automatically generated for your Nucleus project.
By default, Nucleus Projects and their corresponding field mappings are configured to create Incident tickets in ServiceNow. The Nucleus Security app supports creating tickets in any ServiceNow table that extends Task. See Creating Tickets in Non-Incident Task Tables for details on how to configure Nucleus to create other types of Task tickets.
Configure Defaults in the ServiceNow App Connector
The ServiceNow App connector allows you to configure default field values and control how tickets behave when findings are updated or remediated.
To configure defaults and ticket behavior:
- From Connector Setup, locate your ServiceNow connector.
- Click the edit (pencil) icon to modify the connector.
- Select the Set Defaults (Optional) tab.
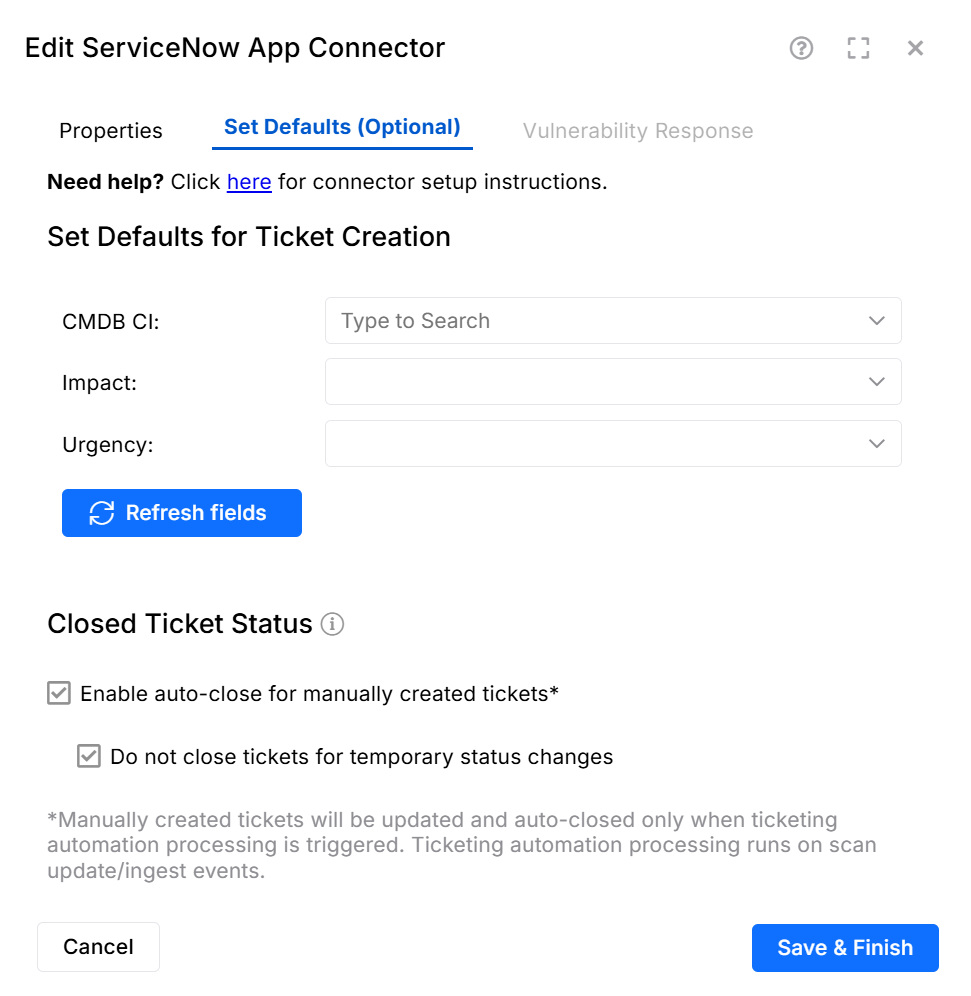
Set Defaults for Ticket Creation
Configure default values for supported fields (such as CMDB CI, Impact, and Urgency). These defaults apply when manually creating tickets or when tickets are created through automation rules.
- Click Refresh fields to load the latest available fields
- Configure values as needed for your environment
- Verify each field loads and displays expected data
Closed Ticket Status
Use this setting to control how manually created tickets are updated and closed when associated findings are remediated.
Enable auto-close for manually created tickets
When enabled, tickets created manually will be automatically updated and closed when all associated findings are remediated.
- New CSV files are attached when new instances are discovered or remediated
- Tickets are updated as findings change over time
- Tickets are automatically closed when all associated instances are remediated
Auto-close occurs during ticketing automation processing, which runs on scan update or ingest events.
Do not close tickets for temporary status changes
When enabled, tickets will not be closed during temporary or non-final status changes. Tickets will only close when findings reach a fully remediated state.
- Click Save & Finish to save your changes.
Testing the ServiceNow App Connector
With the ServiceNow App connector configured, use the following steps to test the connection and ensure successful configuration of the Nucleus Security application coming in to ServiceNow and out to the Nucleus platform:
- Log in to your Nucleus project.
- From the navigation bar on the left, under Vulnerabilities, select Active.
- Select a vulnerability.
- Click Create Ticket.
- Select the ServiceNow App connector.
- Fill in all required fields.
- Click Submit to ServiceNow to test the ticket creation. You should see a success message.
- In the vulnerability, click on the Tickets tab.
- Verify the "status", "priority", and "assignee" columns are loading correctly.
- Click the arrow on the far right side of the ticket. A side window will extend out.
- Verify the description loads correctly.
- In the Comment field, enter a comment.
- Click Comment.
- In the External ID column on the far left, click on the incident number for the ticket. The ticket will open in ServiceNow.
- Verify the ticket is correctly listed.