Overview
Limited Availability
The Fixes experience is in limited availability. This means that you must be signed up with the support team or your Nucleus account representative to participate.
The Fixes feature in Nucleus Security automatically groups vulnerabilities from all your ingested scanning tools in your environment into a single Fix. A Fix is a single action that can remediate multiple vulnerabilities at once.
Why Look at Vulnerabilities by Fix?
Traditionally, security teams focus on vulnerabilities individually, what Nucleus calls an “Expedited Remediation Strategy”. Prioritization schemes such as CVSS, EPSS, and Risk Scores are designed to be individual scores for comparison purposes.
In most organizations, you need to also look at what actions lead to the most reduction in risk. Oftentimes this is an analysis of Root Cause, or determining what are the main sources of vulnerabilities in your technology stack. This is colloquially referred to as “Biggest bang for buck”, but at Nucleus we call this an “Efficient Remediation Strategy”, where the focus is on groups of items that you can address at once and will give you the most risk reduction.
The Fixes page allows customers to manage both efficient and expedited remediation/prioritization strategies in the Nucleus console at once, with end to end workflows. Some of the primary benefits of using Fixes as well as Risk-based Vulnerability Management (RBVM) prioritization methods are as follows:
Reduce Operational Overhead: Address multiple vulnerabilities with a single fix instead of handling each issue separately.
Improve Remediation Efficiency: Prioritize efforts based on the fewest number of actions required to resolve the most issues.
Enhance Risk Reduction: Quickly eliminate clusters of vulnerabilities rather than tackling them in isolation.
Streamline Collaboration: Assign fixes at the asset level to ensure the right teams handle the right vulnerabilities.
By shifting the focus from individual vulnerabilities to actionable fixes, organizations can accelerate remediation efforts, minimize security risks, and improve overall security posture, while maintaining individual prioritization to ensure you’re resolving the most critical vulnerabilities in a timely manner.
This guide walks you through how to use the Fixes page effectively.
Accessing the Fixes Page
Log in to your Nucleus Security instance.
Navigate to the Global Dashboard > Select your project > Vulnerabilities > Fixes to view the Fixes page.
The Fixes dashboard will display a list of fixable actions, grouped by affected assets and required remediations.
Note about updates
The Fixes page is designed to be used at a higher business level compared to individual vulnerabilities. This means that Nucleus does not calculate fix data in real time to prevent huge swings in workflows and recommendations as new data comes into the platform. The Fix data updates at least once a day, but is unique in that it does not calculate in real time.
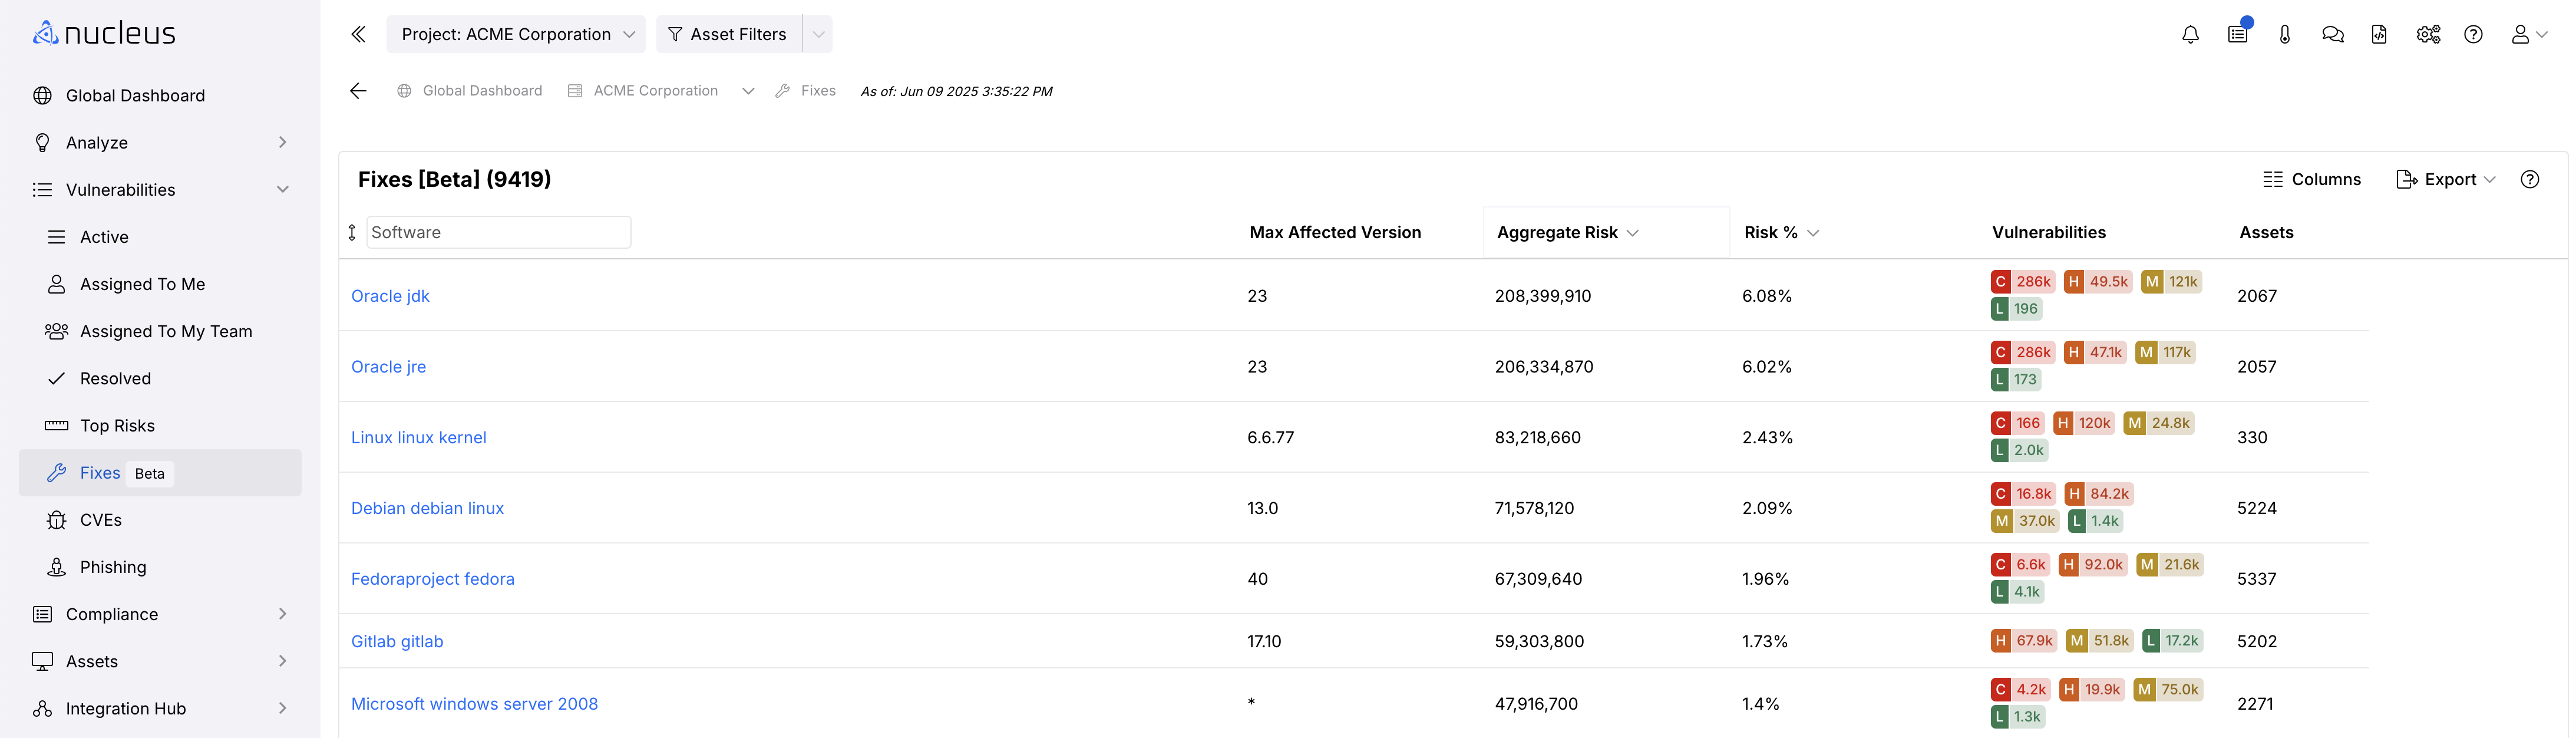
Understanding the Fixes Dashboard
The Fixes page is designed to do two distinct flows:
Help you quickly identify, assess, and act on remediation opportunities.
Report and communicate to leadership on root cause and risk profiles of your tech stack so you can effectively ask for resourcing, and build strategic VM plans to remediate at scale.
Example: You have been putting off a CentOS7 to Rocky Linux migration. You determine through the Fixes page that CentOS poses 15.8% of the total vulnerability risk to your business. It will be much easier to make strategic decisions about what to prioritize at a business level while still addressing critical risks through the traditional vulnerability management experience in the Nucleus console.
Main Components:
Fixes List: Displays grouped vulnerabilities that can be remediated with a single fix.
Search: Allows the ability to search for specific vendors, and software to see how much of a risk that technology poses to your organization.
Fix Details Panel: Provides more information on a selected fix, including affected assets and required actions.
Manage Columns: Set up your view to be exactly what fields you want to track on this page every time you navigate to it.
Columns:
Software: This is the list of fixes in your environment. Currently labeled software
Max Affected Version: This is the version of this technology you must upgrade past in order to resolve this fix.
Aggregate Risk: Every instance of a vulnerability has a risk score, which you can see in various places throughout the application.
.png)
The Aggregate Risk is a sum of all the risk scores of every instance of a vulnerability within this fix. For example in the above screenshot, two instances of a single vulnerability found by Qualys, if they were the only 2 instances of a vulnerability in the Fix, the Aggregate Risk would be 1,120 (560 + 560).
This field is crucial to understanding where you can accumulate the most amount of risk reduction with one action. Numerous vulnerabilities on the same asset can be resolved by upgrading that asset, but which ones and by how much? The Aggregate risk column in conjunction with the other columns on the Fixes page solves this for you.
Risk %: This column is the percentage of risk that this software fix represents across your entire technology ecosystem. This number will help you build strategies and campaigns around long term risk reduction over time.
Vulnerabilities: This column represents the number of vulnerabilities that will be resolved by this fix, broken down by the severity of the vulnerability.
Assets: This column is the number of assets affected by this fix item.
Due Date: This column represents a specific due date for this fix to be completed, in order to do basic project management tracking for reporting purposes. This date can be edited in the Fix Details slide out view.
Viewing and Managing Fixes
Viewing Fix Details
Click on a software fix from the Fixes list.
A side panel will open with:
Fix Description: Explains what the fix entails and what the impact will be if this fix is pushed out to all instances of this vulnerability.
# Active Findings: This is the number of currently active findings that are included in this fix.
Note: This number should match the number in the bottom right of the “Affected Findings” table on this page.
# Resolved Findings: This is the number of findings that have been resolved in the past year for this fix.
Resolved Progress: This is the progress you have made towards fully resolving this fix, so you can see how far you have come.
Due Date: This is a static field that can only be set manually or through automation rules. This field will track for you when you want this fix to be completed by, for goal setting, SLA tracking, and other project management workflows.
Affected Findings: This table lists all instances of vulnerabilities across all scanning tools that will be resolved with this fix. You can click into each instance to get to its specific details, change statuses, assign, and just like all the available workflows on the Vulnerability Details page.
Filter: You have the ability to filter the list of affected instances down to exactly the findings you want to see within the fix. This is crucial to being able to build a workflow where you can assign findings within a fix.
Columns: Allows you to choose which columns you would like to see when you go to this page, and set defaults.
Modify: This allows you to bulk modify instances. A common use case is assigning all instances within an asset group to a team, and then when that team logs into the console they will only see those instances they have been assigned within the fix,
Export: You can export the list of instances that are within this fix, allowing you to easily share information and report on data outside the Nucleus console.
Note on Filtering
This page will dynamically filter based on your access, so if you are part of a restricted access group, the fix details will only show you what you need to fix in your workflow. In other words, as a remediator, you will only see the findings and assets assigned to you. The metrics in the top of the page will update to be specific to you.
.png)
Assigning Fixes to Teams
If a fix affects multiple assets, you can assign responsibility to different teams based on asset ownership to ensure clear accountability.
Assigning Teams at the Instance Level
Click on a fix from the Fixes list.
In the Fix Details Panel, locate the Affected Findings table.
Optional: Use filters to get down to the exact list of instances you want to modify.
Select an instance using the checkboxes. You can select multiple, or select all using the “select All” checkbox”
Click the Modify button
.png)
Select the action you would like to take on the selected findings. Fill out the associated action card and then click “Start Bulk Action”.
The findings will be updated in bulk to your desired outcome and you can continue with your workflows as usual.
By assigning fixes at the asset level, organizations can ensure the right teams are responsible for resolving issues based on asset ownership, improving clarity and efficiency in remediation efforts.
Best Practices for Using Fixes
Regularly review the Fixes page to stay ahead of vulnerabilities. Nucleus recommends two different operating cadences:
One for remediation teams acting in real time
Another for business strategy and remediation plans, such as quarterly reviews or planning.
Assign fixes at the asset level to ensure the right teams are accountable.
For further assistance, visit our Documentation Center or contact Nucleus Support.
Need Help?
If you have any questions or need support, reach out to our Help Desk via Nucleus Support.