Managing Projects
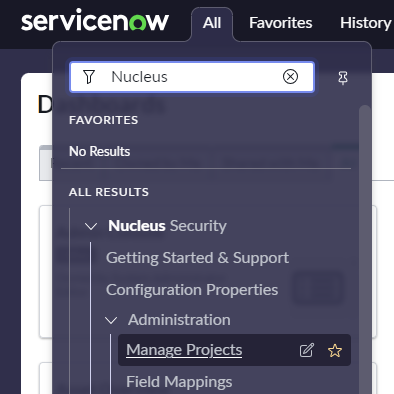
The Manage Projects page, found under All > Nucleus Security > Manage Projects, is used to manage all configuration options related to a Nucleus Project. The following topics provide an overview of the primary features of Manage Projects.
Creating Tickets in Non-Incident Task Tables
The Configuration Table specifies the table in ServiceNow to use when creating tickets from Nucleus. Projects are configured to write to the Incident table by default, but can modified to point to any table in ServiceNow that extends Task.
It is best practice to set your Configuration Table during your initial setup and configuration, prior to rolling out to end users. If you modify the Configuration Table after tickets and/or ticketing rules have been created, existing tickets will remain available in Nucleus and updated if created by ticketing rules. However, some of the mappings for previewing tickets in Nucleus may display incorrectly.
Prerequisites
Before modifying the Configuration Table:
- Ensure the Service Account (
nucleussec.project) has 'Write' and 'Create' permissions on the target Task table.- Note that some core and/or special purpose Task tables do not provide discrete 'Write' and 'Create' permissions by default, and therefore require the 'Admin' permission in order for Nucleus to create and update records.
- Example tables requiring 'Admin' permission: task, change_phase, business_app_request, required_field_remediation, cmdb_multisource_recomp_task, recommended_field_remediation, sys_report_access_request, service_task, orphan_ci_remediation, change_request_imac, stale_ci_remediation, kb_knowledgebase_request, roster_schedule_span_proposal, upgrade_history_task, reclassification_task, statemgmt_renew_lease_task
- Ensure that Cross scope privileges have been configured for the Nucleus Security App. Installing the Nucleus Security app automatically configures Cross scope privileges for several common tables that extend Task. However, if configuring Nucleus to write to a custom Task table or a task table from another application, you will need to manually add Read, Create and Write Cross scope privileges for that table. See Configuring Application Cross-Scope Access below for step-by-step instructions con configuring Cross scope privileges.
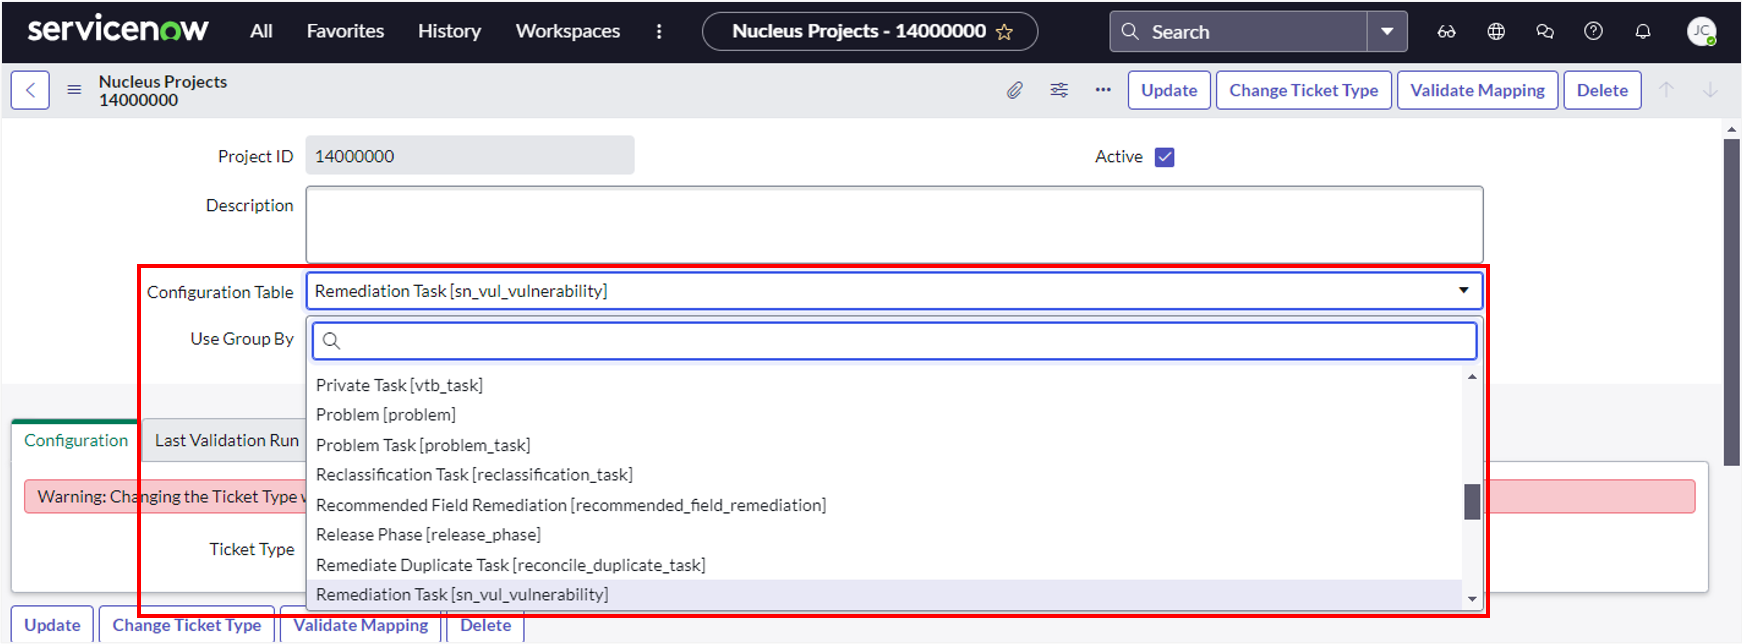
Modifying the Configuration Table
To modify the target Configuration Table:
- Click on the
Configuration Tabledropdown. - Select from the list of tables that extend
Task:
- Click Update to save your changes. This will automatically modify the
Target Tableoption on all Field Mappings for the project to the specifiedConfiguration Table. - In Nucleus, go to Project Administration > Connector Setup.
- Edit the ServiceNow App Connector.
- Click the Connect to ServiceNow button,
- Select the the Ticketing tab, then click Refresh fields to refresh the modified Field Mappings from ServiceNow.
- Click Save & Finish to save your changes.
Configuring Application Cross-Scope Access
The screenshot below illustrates the Create, Read and Write Cross scope privileges needed for the Nucleus Security app to write to the Remediation Tasks (sn_vul_vulnerability) table:
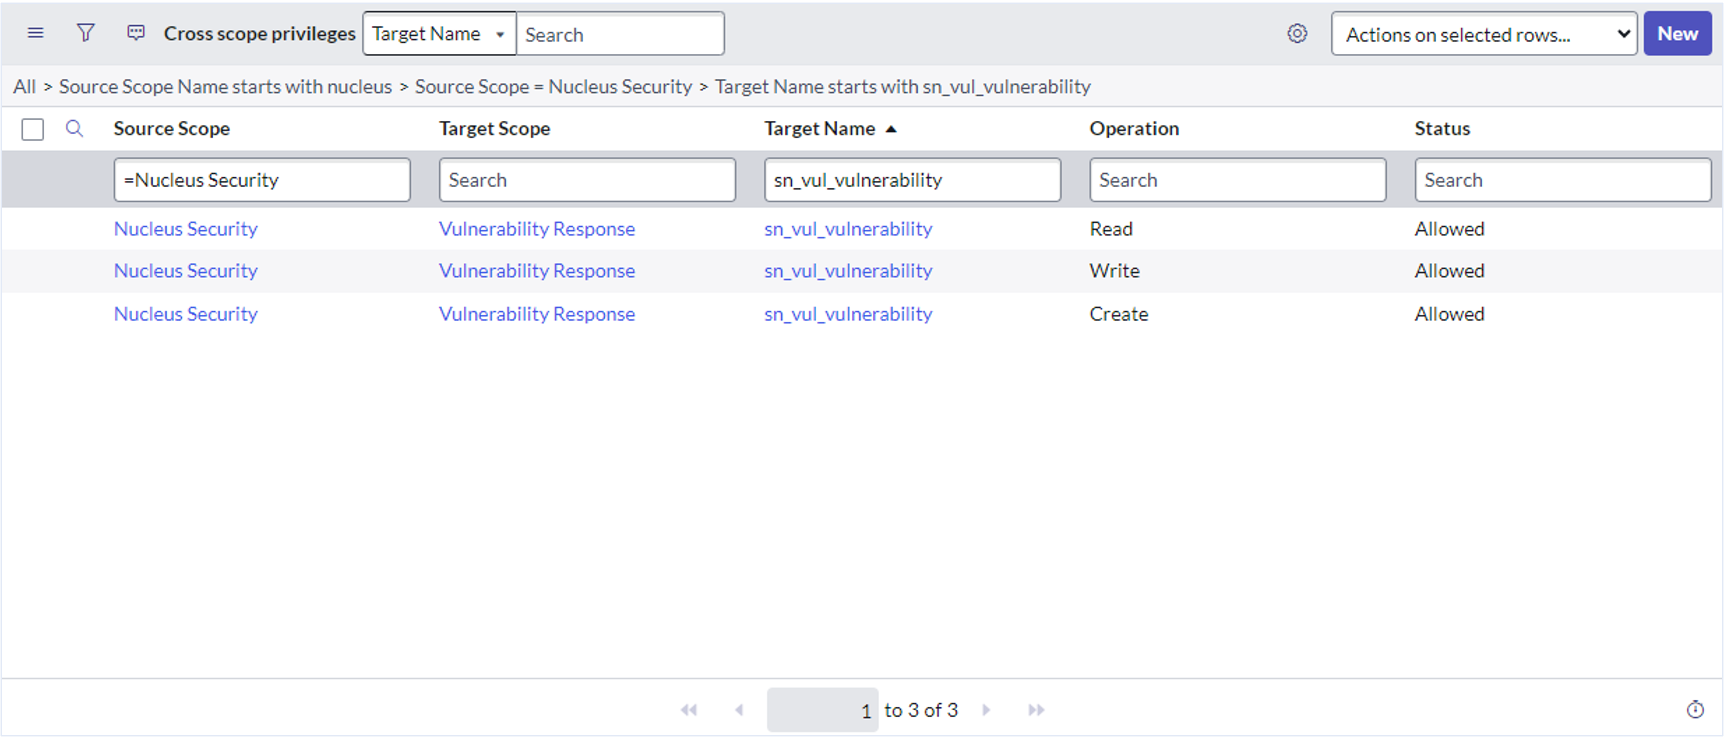
The following steps illustrate how to add cross scope privileges for the Remediation Tasks (sn_vul_vulnerability) that is part of the Vulnerability Response scope:
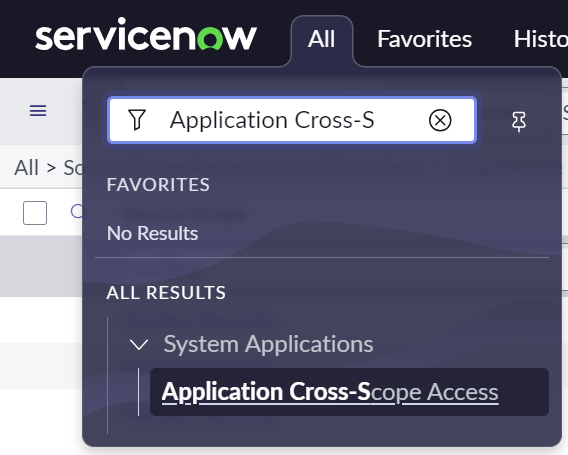
-
In ServiceNow, navigate to All > System Applications > Application Cross-Scope Access:
-
Change your Application Scope to Nucleus Security:
-
Click the New button.
-
Configure the new privilege as follows:

- Source Scope and Application shoud default to 'Nucleus Security'.
- Set Target Scope to the application scope of your
Configuration Table, 'Vulnerability Response' in this example. - Set Target Type to the name of the table selected as your
Configuration Table. - Set Target Type to 'Table'.
- Select 'Create' as the Operation.
- Select 'Allowed' as the Status.
-
Click Submit to save your changes.
-
Repeat these steps to add 'Read' and 'Write' privileges for your
Configuration Table.
Ticket Types
There are three configurations for creating tickets in ServiceNow:
- Parent/Child: A parent ticket will be created for the Vulnerability and separate child tickets for each Vulnerable Item (asset/CI). This is the default ticketing configuration.
- Single: A single ticket will be created and affected assets will be listed in the ticket Description.
- Catalog Item: Integrates with Catalog Items to submit Service Requests for vulnerabilities.
Changing Ticket Types
Changing the ticket type for your project will reset all mappings to their default settings for the selected ticket type. All custom mappings and changes to default mappings will be lost.
Follow the steps below to change the ticket type for your project:
- In ServiceNow, go to Manage Projects, then open the project you want to modify.
- Click the Change Ticket Type button, select 'Single' or ‘Catalog Item’ as the new ticket type, then press OK.
- Click Update to save your project.
- Refer to the section below on re-syncing your connector in Nucleus.
Re-syncing a Connector in Nucleus
After modifying the ticket type and/or enabling the Group By option on a Nucleus Project in ServiceNow, you will need to re-sync the connector information In Nucleus:
- Go to Project Administration > Connector Setup.
- Edit your ServiceNow App connector.
- Click Connect to ServiceNow, then click Save and Finish.
- Based on the selected Ticket Type, proceed to the section on Configuring Single Ticketing or Configuring Catalog Integration for more information.
Configuring Single Ticketing
Default mappings are automatically created when you change the ticket type to Single. You can further customize how tickets are created by:
- Modifying the target Configuration Table
- Creating Custom Field Mappings
- Using the Group By feature to group tickets by an attribute in Nucleus.
Group By for Single Ticketing
The Group By option allows you to group findings by any of the Nucleus Available fields. This is commonly used for use cases like grouping instances by Assigned Team Name.
To configure Group By:
NOTE: modifying the Group By option on a project will replace ALL existing mappings you have created or modified. After configuring Group By, you will need to re-sync your connection in Nucleus.
-
In ServiceNow, go to Manage Projects, then open the Project you want to modify.
-
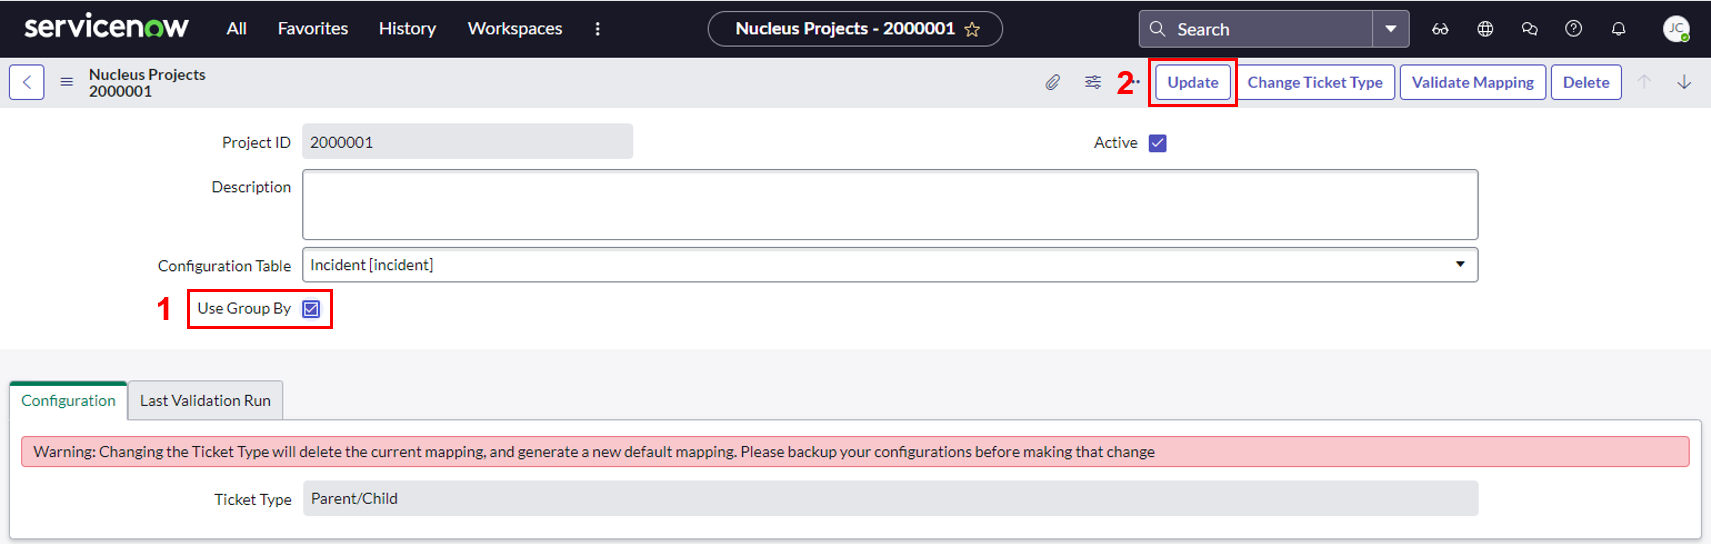
Enable the Use Group By option, then click Update.
-
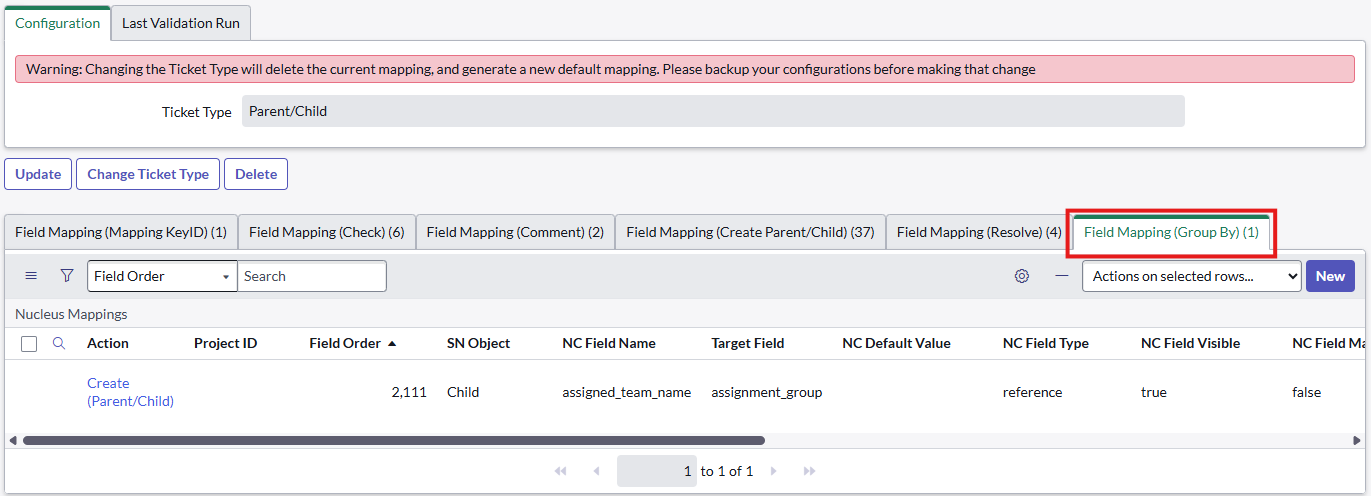
Edit the project again, click on the Field Mapping (Group By) tab, then click New to create a new Group By mapping.
-
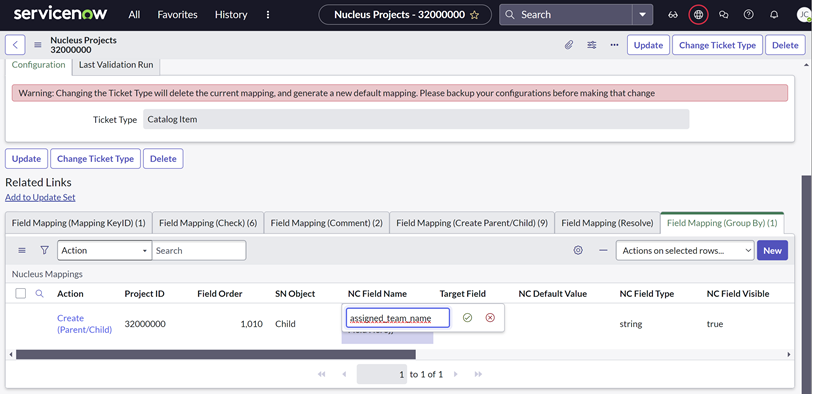
This screenshot provides an example for how to configure the Group By mapping:
- SN Object: ensure this is set to 'Child'.
- Group By: ensure this is checked (enabled).
- NC Field Name: enter the field name from any of the Nucleus Available fields to use for grouping finding instances.
- This mapping is used solely to determine how to group instances of a finding, all other options on this mapping will not alter how tickets are created.
-
Click Submit to save your Group By mapping.
-
Be sure to re-sync your connector in Nucleus.
After enabling Group By for Single ticketing, Parent mappings (SN Object = Parent) are used to configure how tickets are populated. Child mappings should only be created for use as grouping fields.
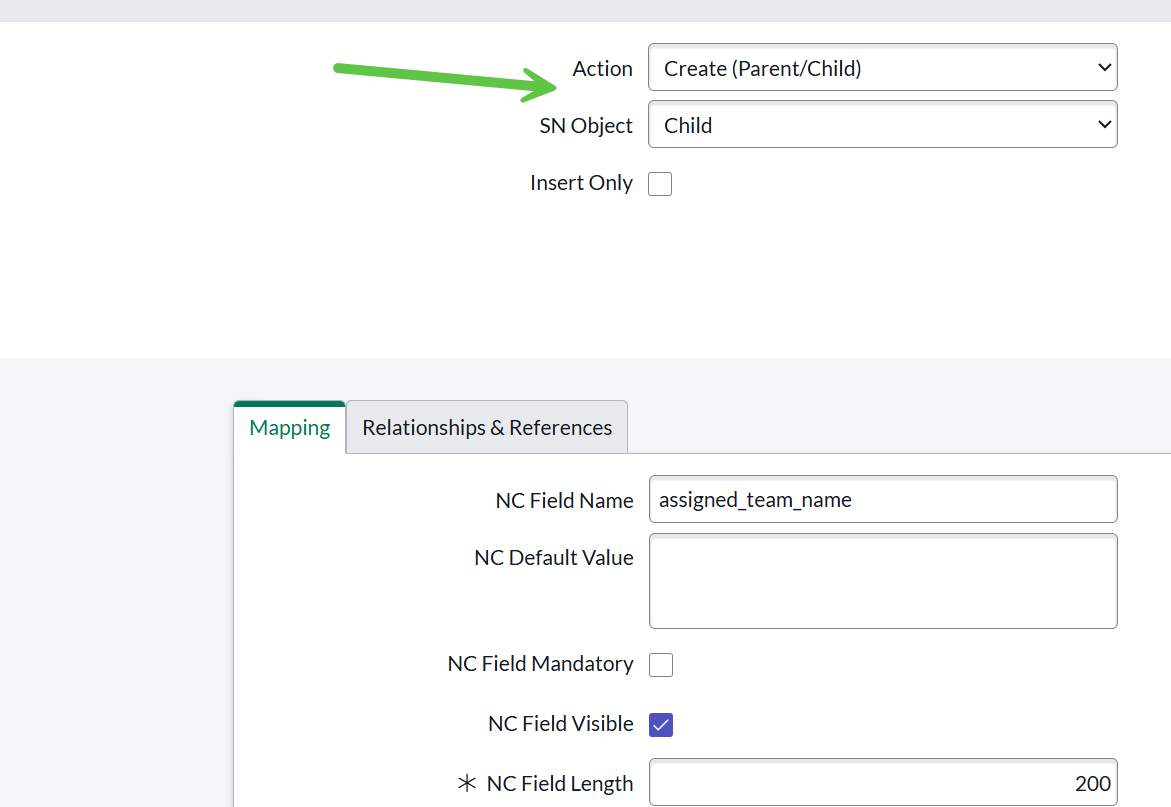
NOTE: When configuring Single Ticketing with Group By, mappings must be created using Create (Parent/Child) actions with the appropriate SN Object (typically "Child" for grouping fields).
Although the ticket type is set to "Single," grouping requires defining how individual instances are organized. This is done through Parent/Child-style mappings in ServiceNow, which are used to structure and group the underlying data.
As a result, you will select Create (Parent/Child) when configuring mappings for grouped Single Ticket setups.
Configuring Catalog Item Integration
Integration between the Nucleus ServiceNow App connector and the ServiceNow Service Catalog provides the ability to create Requests, manually or through Ticketing Automation rules, for vulnerabilities ingested into Nucleus.
How it works
Tickets are submitted as Catalog Requests, with Request Items for each vulnerability or group of vulnerabilities if using the Group By feature. Field Mappings are used to define which field passed from passed from Nucleus are used to populate variables defined in the Catalog Item. Request Items are treated as 'tickets' in the Nucleus UI and can be previewed in the vulnerabilities details dialog or from the Tickets section. A CSV is attached to each Request Item with details about the assets containing the vulnerability. When instances of a vulnerability are mitigated in Nucleus, a comment will be added to the associated Request Item along with an updated CSV.
Note: Because Request Items and other related items like Catalog Tasks created by workflows are intended to be managed by the Service Request system in ServiceNow, the auto-close feature in Ticketing automation rules will NOT attempt to close Request Items.
After changing your ticket type to Catalog Item, use the following steps to configure the integration:
- Select the Catalog Item to use for submitting requests from Nucleus, then click Update.
- Select the Catalog Processing option that best represents how you want Requests creation to be handled in cases where users attempt to create multiple Requests for the same finding/finding instance:
- Process Asset Differential (default): Creates a new Requested Item for all newly ticked vulnerability instances. Once a Requested Item has been created, Nucleus will continue to update the it with comments and updated CSV attachments for assets (vulnerability instances) associated with the original Request. Newly discovered instances of a vulnerability are never added to an existing Requested Item.
- Create New RITM: Creates a new Request Item for all selected assets, even if all or a subset of selected instances have previously been ticketed.
NOTE: if using this option, you will also need to edit the default mapping for rule_id and enable the IsActive option. - Process Per Vulnerability: Creates and updates a single Requested Item per unique vulnerability in Nucleus. Newly discovered instances of a vulnerability are tracked in comments and updated CSV attachments on the original Requested Item.
- Default Mappings:
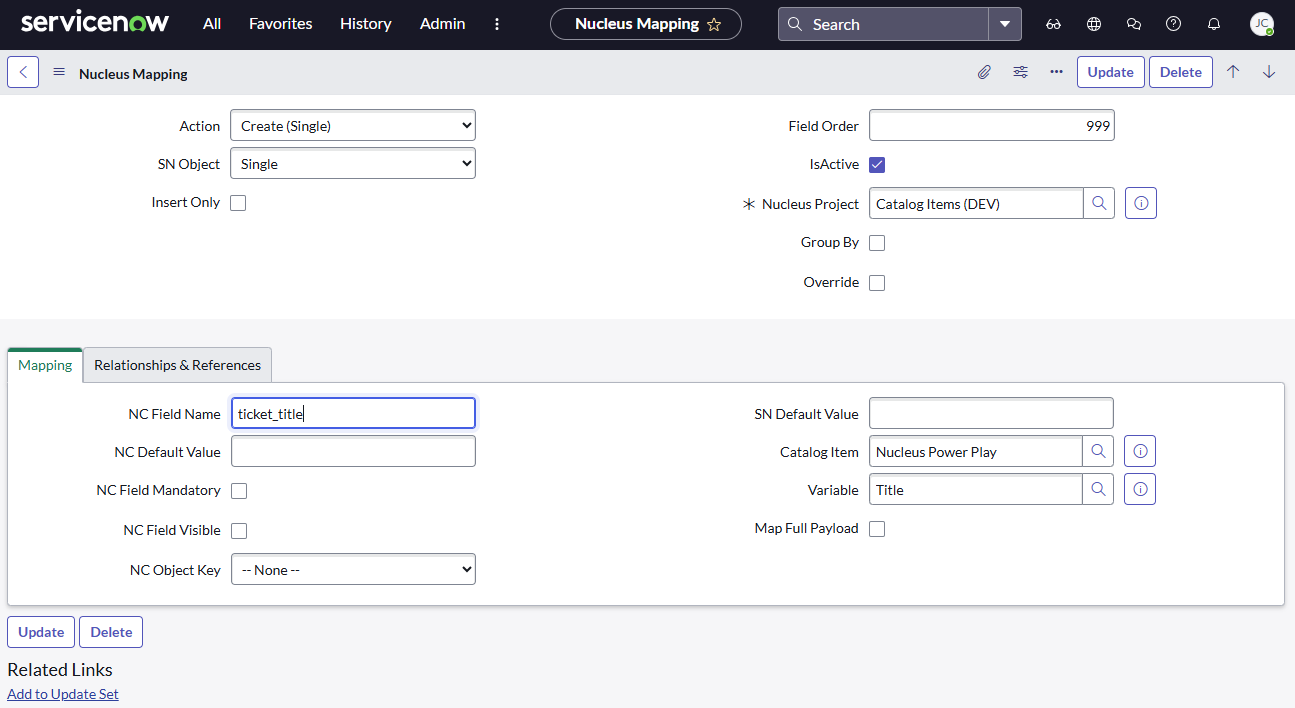
- Default mappings are automatically created for variables defined in the Catalog Item, providing the ability to map Nucleus Available Fields to populate variables:
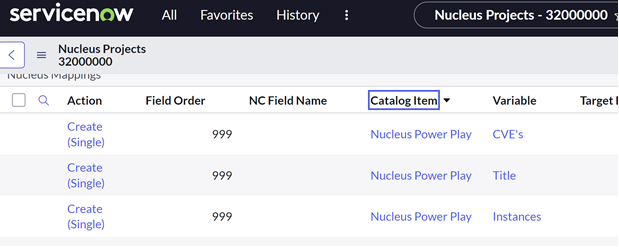
- To map a specific Nucleus Available Field to a variable, edit one of the Variable mappings, then modify the NC Field Name to define which available field to pass into the variable:
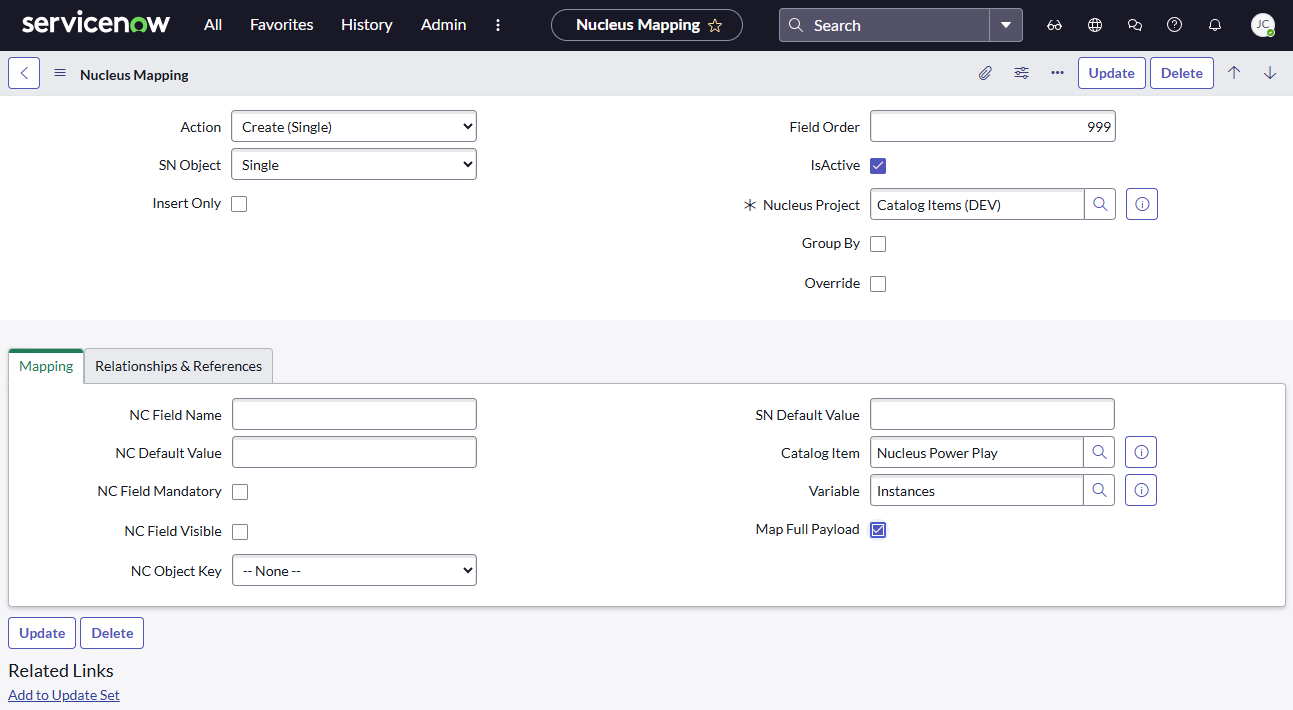
- Alternatively, you can configure Nucleus to pass ALL available fields to a variable by leaving the NC Field Name blank, and checking the Map Full Payload option:
- Here is an example Request Item illustrating the values populating the variables defined in the Catalog Item:
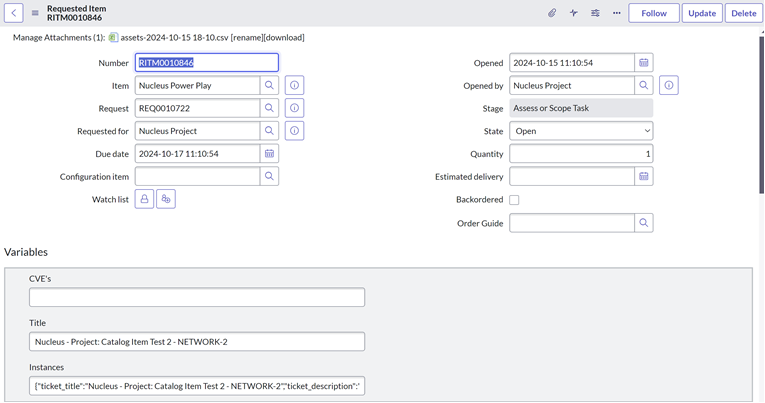
- Default mappings are automatically created for variables defined in the Catalog Item, providing the ability to map Nucleus Available Fields to populate variables:
After re-syncing your connection in Nucleus, you are ready to begin creating tickets (Request Items) manually through the vulnerability details dialog, or setup ticketing automation rules.
Group By for Configuration Items
The Group By option allows you to group finding instances by any of the Nucleus Available fields. This is commonly used for use cases like grouping instances by Assigned Team Name.
To configure Group By:
NOTE: modifying the Group By option on a project will replace ALL existing mappings you have created or modified.
- In ServiceNow, go to Manage Projects, then open the Project you want to modify.
- Enable the Use Group By option, then click Update.
- Edit the project again, click on the Field Mapping (Group By) tab, notice a new default mapping is created to configure your grouping field.
- Update the NC Field Name field by specifying the available field name from Nucleus you wish to group by:
With this configuration, if a user or ticketing rule creates a ticket on a finding that has instances assigned to multiple teams, one request item will be created for each team containing only the assets associated with that team’s assignments.
Creating Custom Field Mappings
Custom field mappings can be used to enrich ServiceNow tickets with additional information from the list of Available Fields from Nucleus using Create actions, to prompt users for field values during ticket or ticketing rule creation, or to configure additional field to group tickets by like Assigned Team Name on vulnerabilities instances or Business Owner Team on Assets.
If two different fields are mapped to the same Target Field in ServiceNow, the Nucleus Security app will automatically chain these fields together with new lines.
The examples below provide step-by-step instructions for creating a new mapping, along with several examples common Use Cases for defining custom Field Mappings.
Add Nucleus Risk Score to the Description on Parent Tickets
For projects configured with the Parent/Child ticket type, a parent ticket is created for the unique finding in Nucleus, with child tickets for each finding instance (asset). It is common to create Field Mappings on Parent mappings with additional attributes associated with the finding as a whole, and Field Mappings on Child mappings with additional attributes specific to a finding instance.
This example illustrates how to map a finding-level attribute called finding_risk_score from the list of available Nucleus Fields to the Description field of tickets created in ServiceNow:
- In Manage Projects, select the Field mapping (Create Parent/Child) tab (bottom of page).
- Click the New button to create a new mapping, then configure the mapping as shown below:
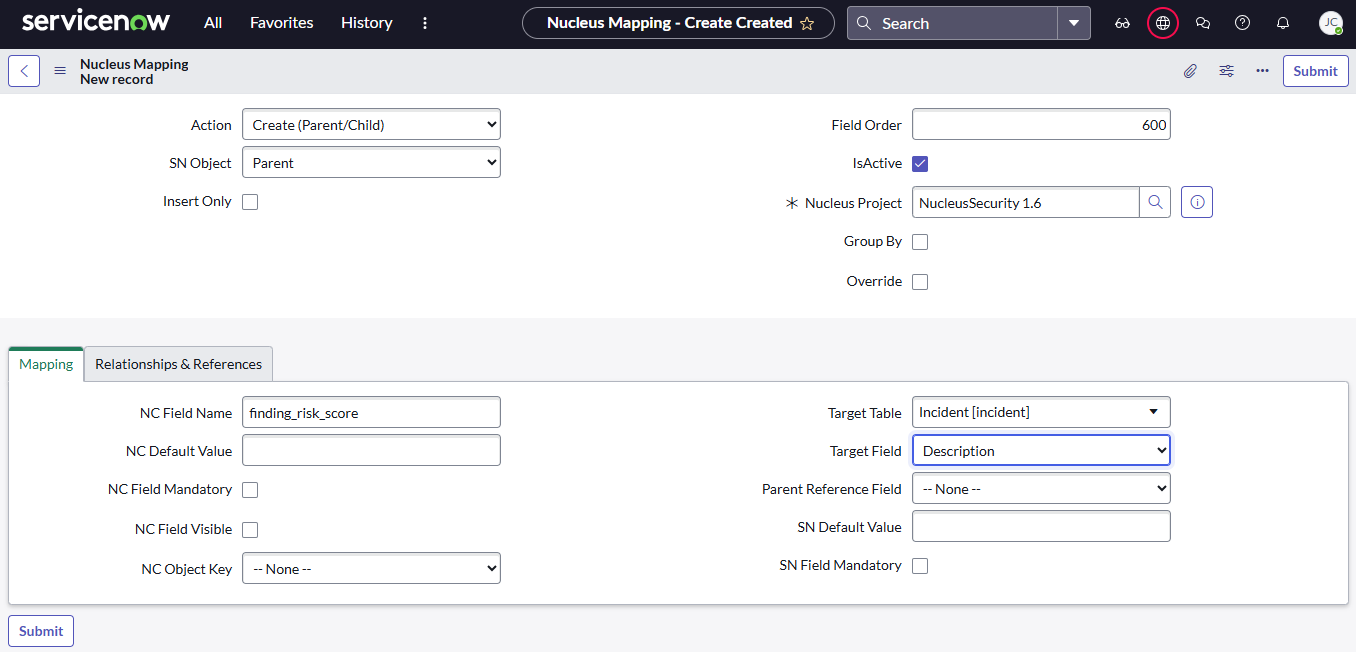
- If not already specified, select "Create (Parent/Child)" as the
Action. - Select "Parent" as the
SN Object. - Enter a unique number between between 600 and 1000 for
Field Order. - Ensure
Is Activeis checked. - Under the Mapping tab, enter "finding_risk_score" as the
NC Field Name. - Enter "40" as the
NC Field Length. - Select "String" as the
NC Field Type - Optional: Disable(uncheck) the
NC Field Visibleoption as this value will be passed directly from Nucleus. - For
Target Table, select the same table as is specified inConfiguration Tableon the project. - Select "Description" as the
Target Fieldto write values to. Since multiple mappings write to the Description field, values from this mapping will be inserted on a new line in the relative order defined by theField Ordercolumn.
- If not already specified, select "Create (Parent/Child)" as the
- Click Submit to finish creating the field mapping.
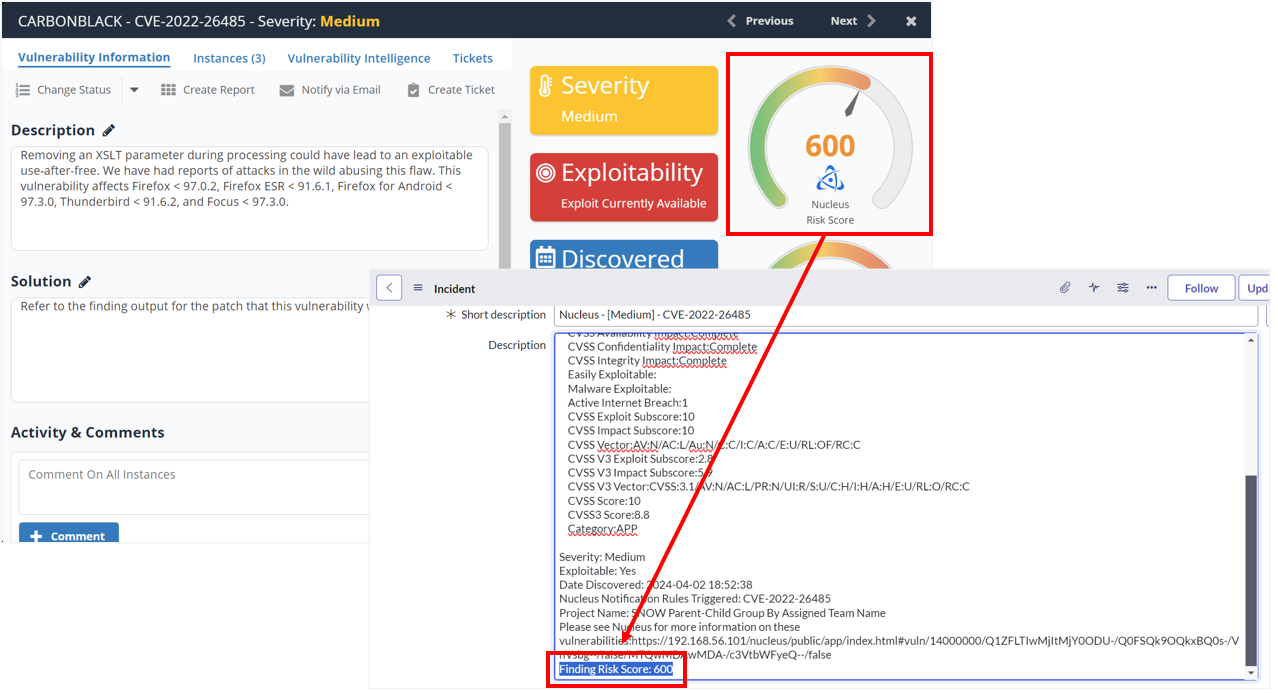
When tickets are created from Nucleus, the Nucleus Risk Score will now be inserted in the Description field on Incidents:
Add attributes from Finding References to Description field on Parent Tickets
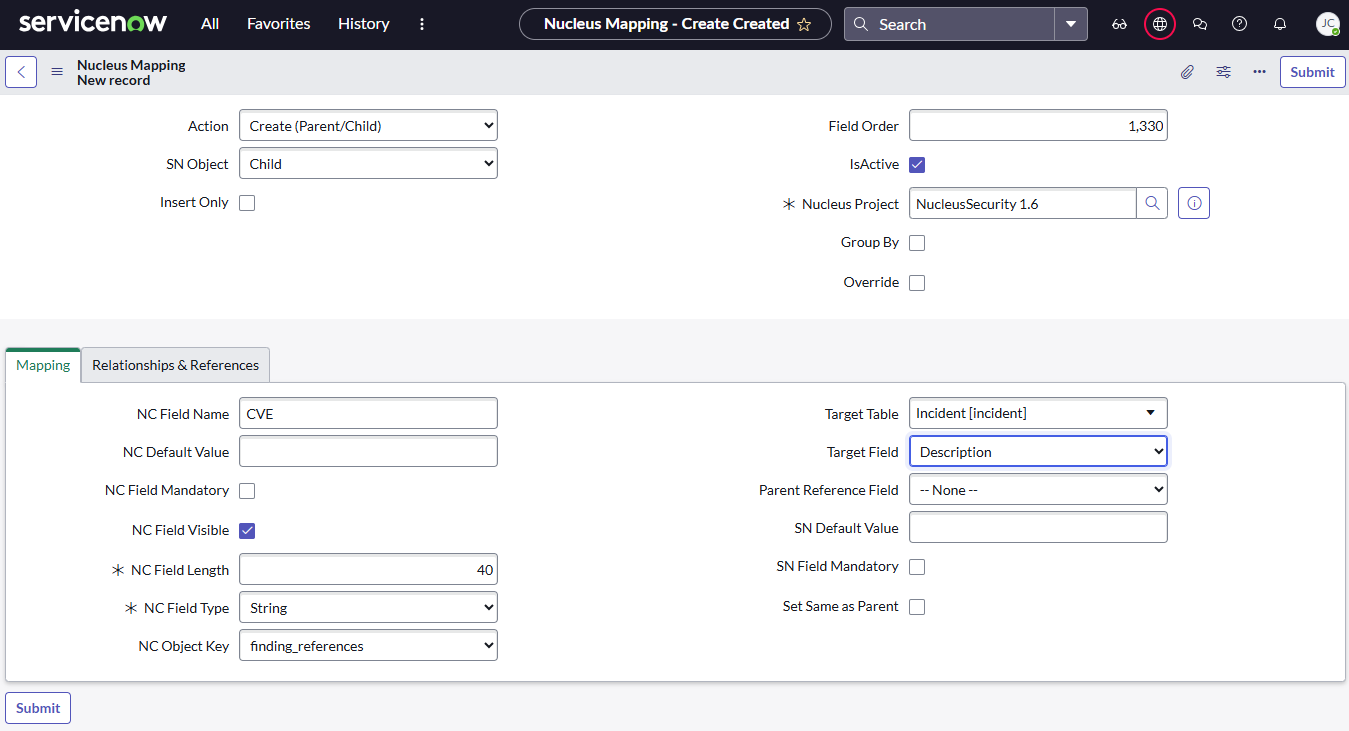
Finding References are found under Reference Information in the finding details dialog in Nucleus. These attributes will vary across findings based on the information provided by the scanner from which the finding was ingested. For these type of mappings, you will set the NC Object Key to "finding_references" and NC Field Name to one of the fields passed as part of Finding References from Nucleus. For instructions on how to see the complete set of fields being passed from Nucleus, see TODO Using Logs to View Available Fields Passed from Nucleus.
The screenshots below illustrate a mapping that adds the "CVE" field from Finding References to the "Description" field on ServiceNow tickets. Note that NC Object Key is set to "finding_references" and NC Field Name is set to "CVE".
-
Field Mapping:
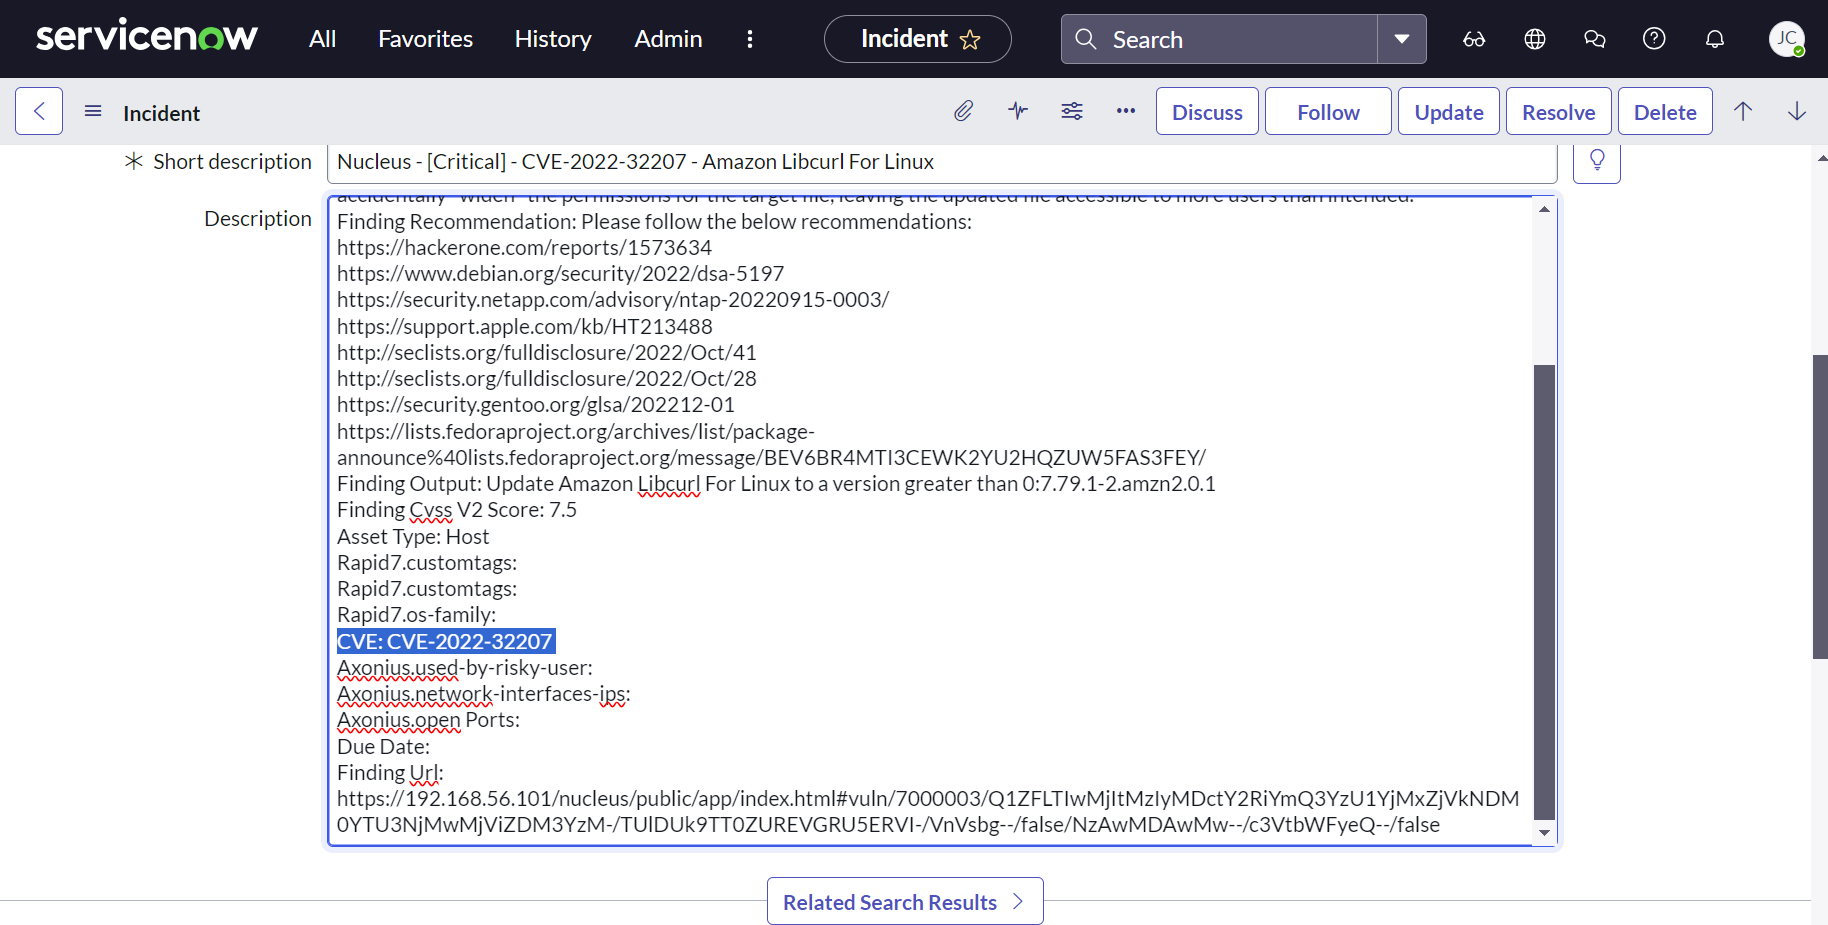
-
Resulting Ticket in ServiceNow:
Add attributes from Additional Metadata on Assets to Description field on Child Tickets
Additional Metadata attributes can be found in Additional Metadata section when viewing Asset details in Nucleus. These attributes will vary across assets based on the information provided by the scanner from which the finding was ingested. For these type of mappings, you will set the NC Object Key to "asset_info" and NC Field Name to one of the Additional Metadata fields passed from from Nucleus.
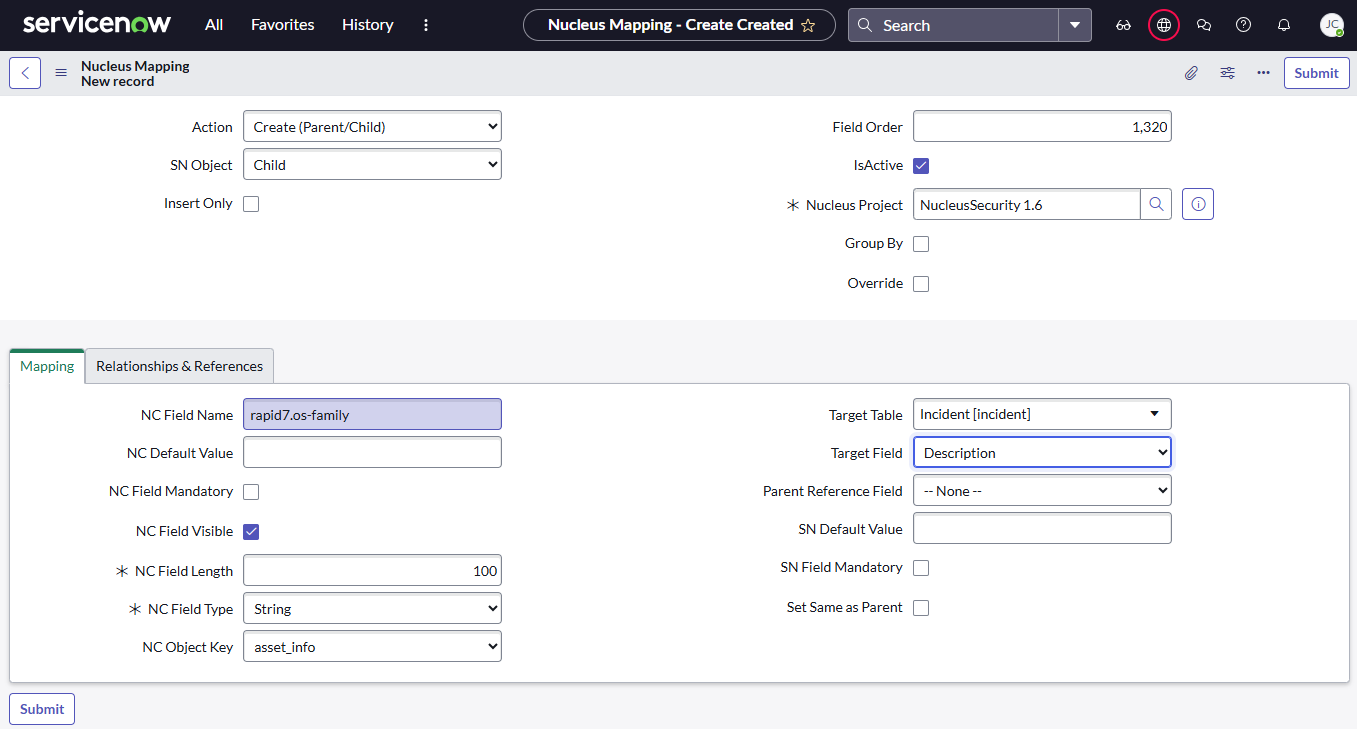
The screenshots below illustrate a mapping that adds the "rapid7.os-family" from Additional metadata to the "Description" field on ServiceNow tickets. Note that NC Object Key is set to "asset_info" and NC Field Name is set to "rapid7.os-family".
-
Field Mapping:
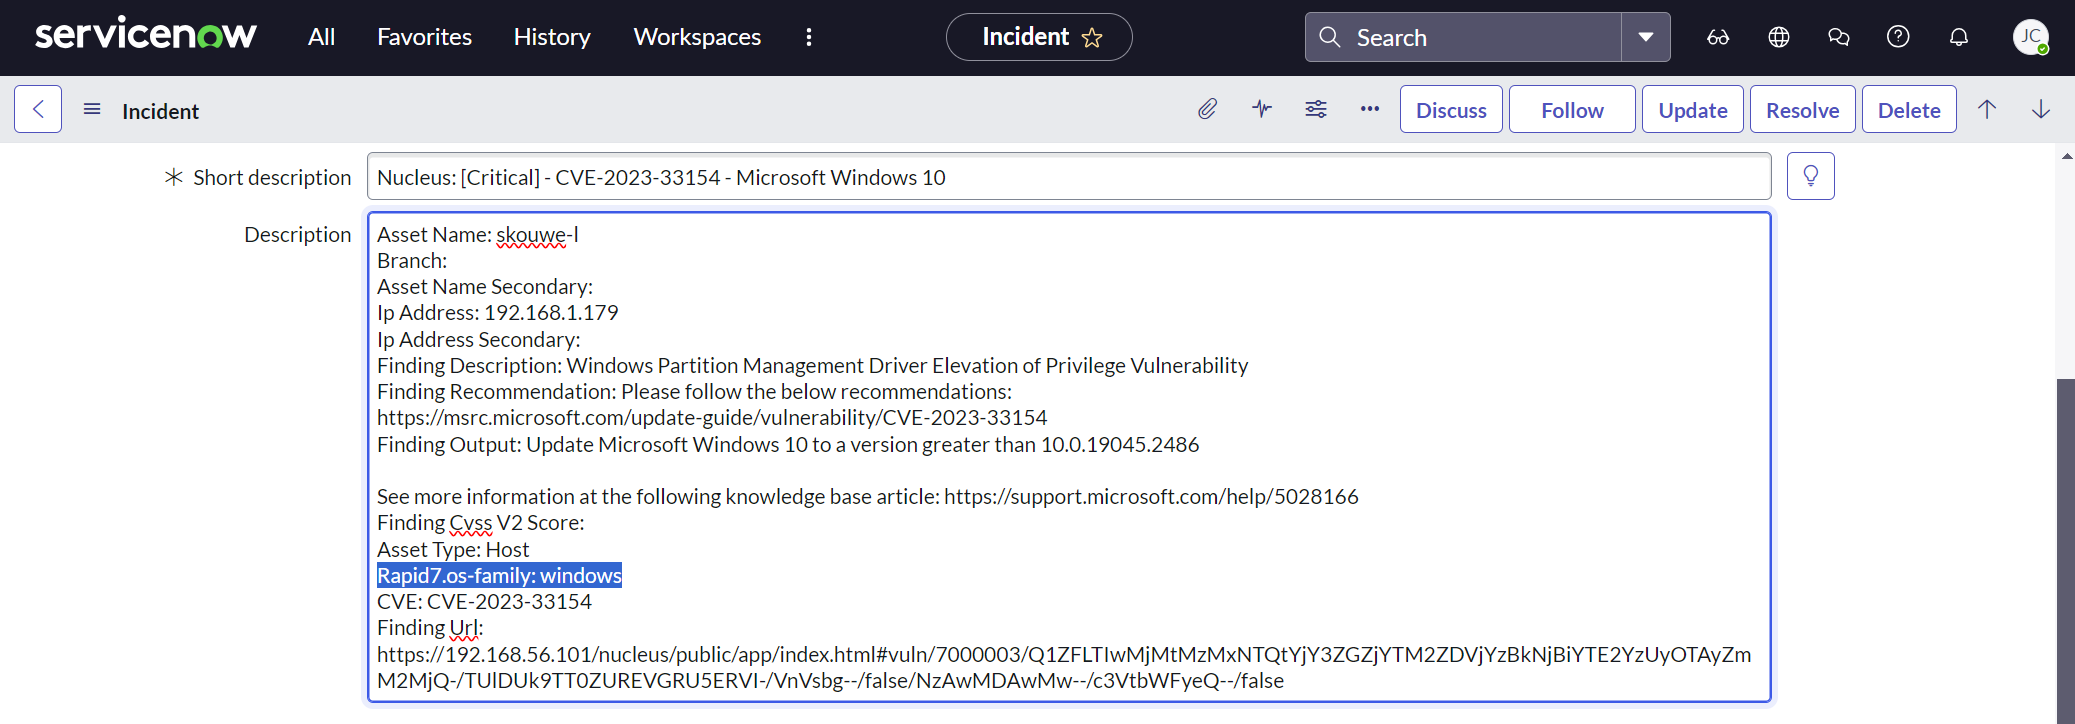
-
Resulting Ticket in ServiceNow:
Set Assignment Group on Child Tickets based on Business Owner Team
The Assignment Group field on task tables in ServiceNow stores the sys_id for the Group assigned to a given task. In order to automatically set the Assignment Group based on a Team from Nucleus (i.e. Assigned Team on finding instances, Business Team or Support Team Owners on Assets), you will need to ensure the Team names in Nucleus are identical to the corresponding Group Names in ServiceNow. A mapping with NC Field Type of "Reference" will be used in order to lookup Group's sys_id based on the Team Name from Nucleus to populate the Assignment Group field on created tickets.
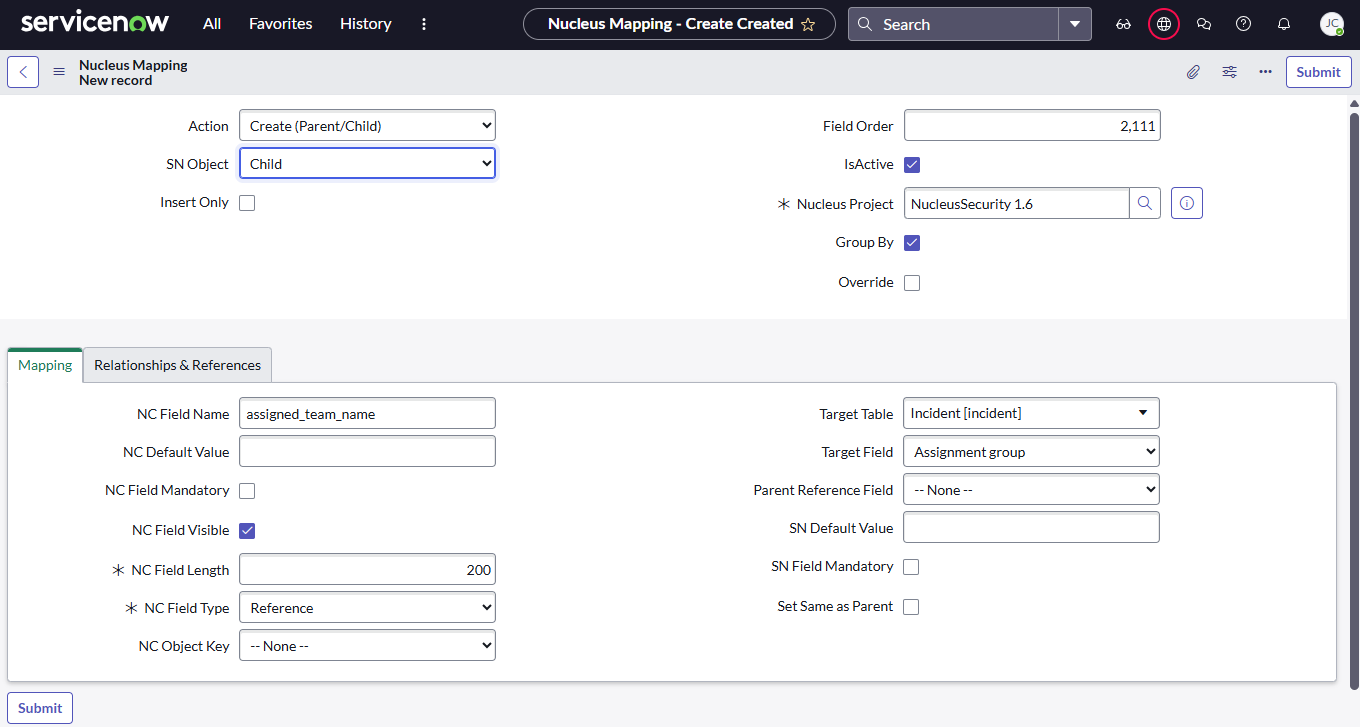
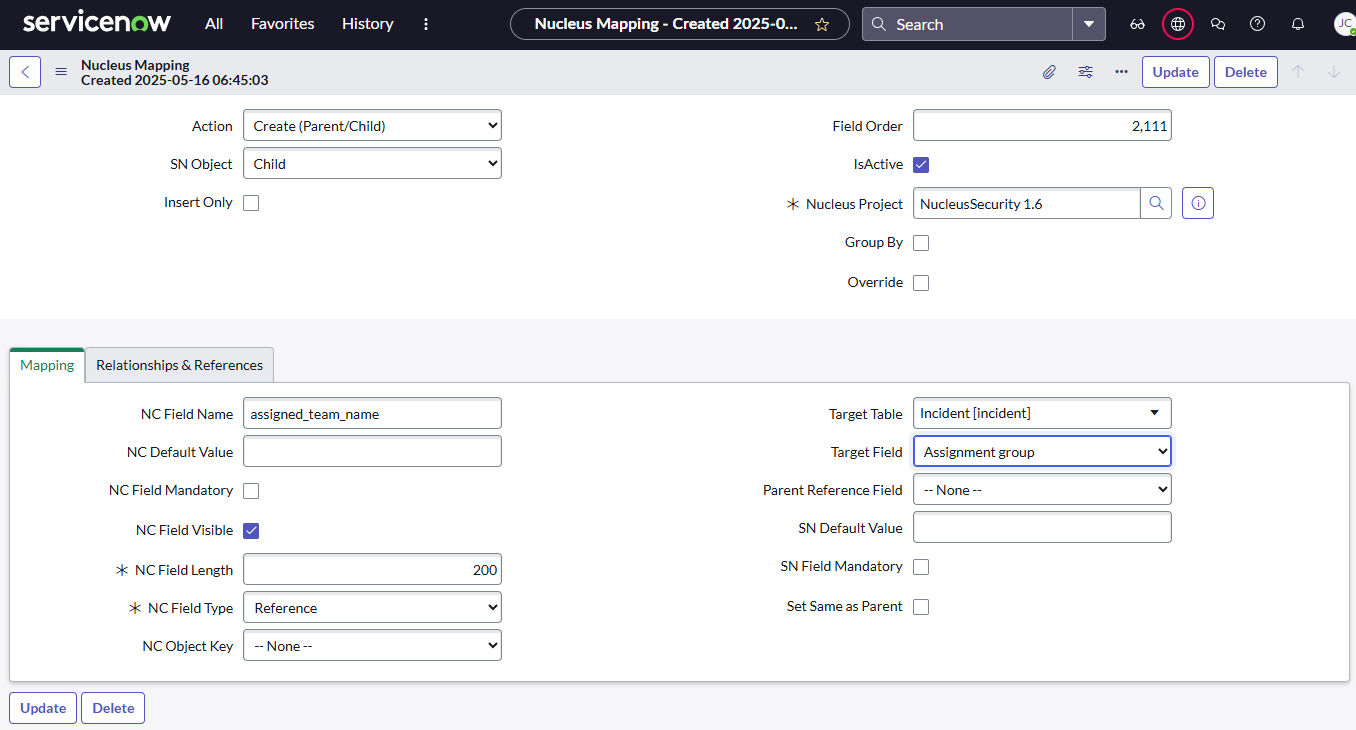
The screenshots below illustrate a mapping that sets the "Assignment Group" on "Child" tickets in ServiceNow based on the Assigned Team Name on finding instances in Nucleus. Notice the options selected for the following fields: NC Field Name is set to "assigned_team_name", Target Field is set to "Assignment Group", NC Field Type is set to "Reference", SN Table Name is set to "sys_user_group", SN Lookup Display Fields is set to "name", and SN Lookup Query Fields is set to "name" (these should be configured as shown to ensure proper lookup and population of values). Some other options like the Field Order value should be selected based on your specific use case. Field Order does not need to match a specific value, but must be unique within the project and follow general ordering guidelines.
- Field Mapping - Mapping tab:
- Field Mapping - Relationships & References tab:

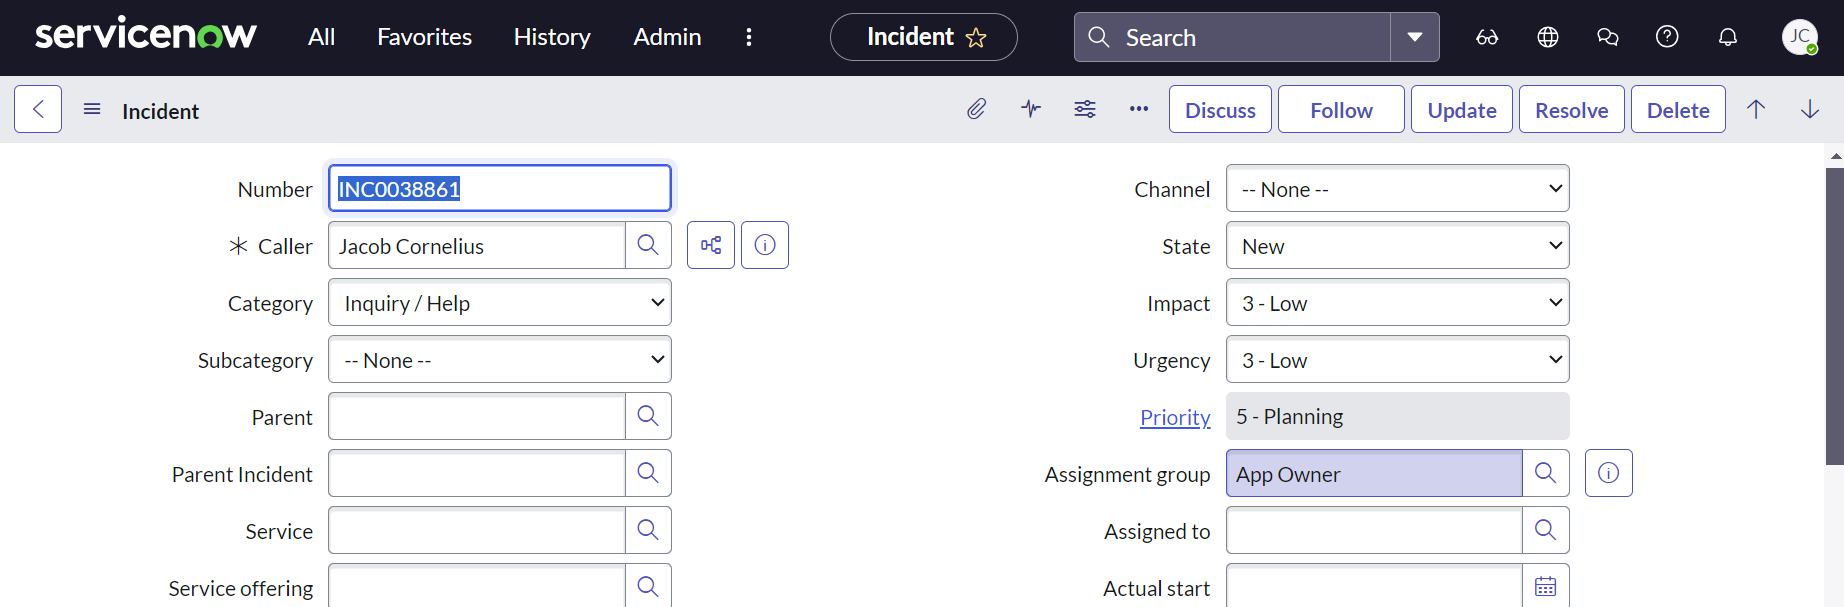
- Resulting Ticket in ServiceNow:
Set Configuration Item on Child Tickets based on Asset Metadata using CMDB Override
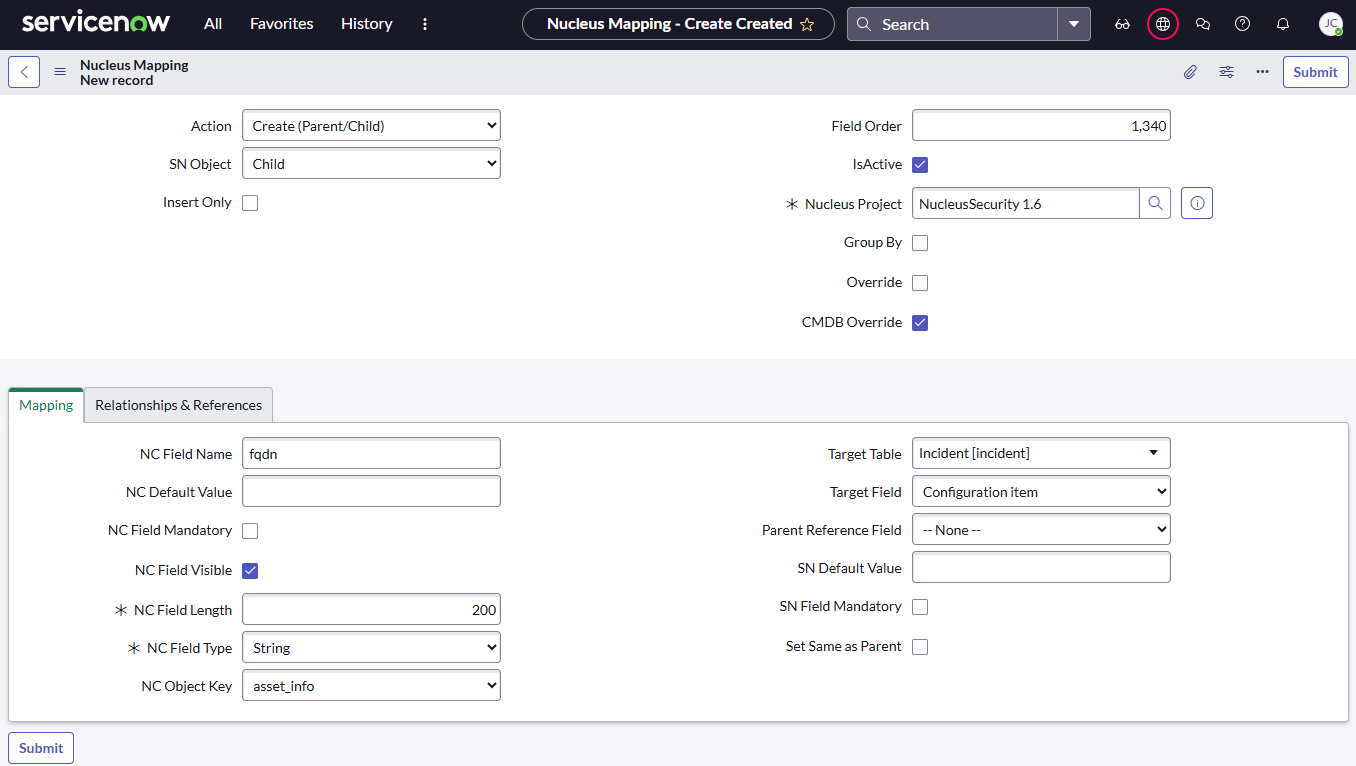
When creating tickets in ServiceNow, Nucleus attempts to set the Configuration Item (cmdb_ci) by matching on the Asset Name and/or IP Address for the vulnerable Item. In scenarios where organizations use a naming convention other than hostname or IP Address, the CMDB Override option can be used to set the Configuration Item based on any available field passed from Nucleus.
The screenshot below illustrates a mapping using the CMDB Override option to set the cmdb_ci for child tickets based on an Additional metadata field on assets called fqdn. When creating tickets, Nucleus will look for a field called fqdn within the asset_info attributes and attempt to set the cmdb_ci based its value.
Field Mapping:
Dynamic ticket grouping using Group By
The Group By feature for the ServiceNow ITSM connector provides the ability to generate multiple Single or Parent-Child groupings per Unique Vulnerability based on a grouping field like assigned_team_name on a vulnerability instance or support_team_name assigned to an asset.
Prerequisites
- This feature is not supported for ServiceNow Vulnerability Response.
Configuring Dynamic Grouping based on "Assigned Team Name"
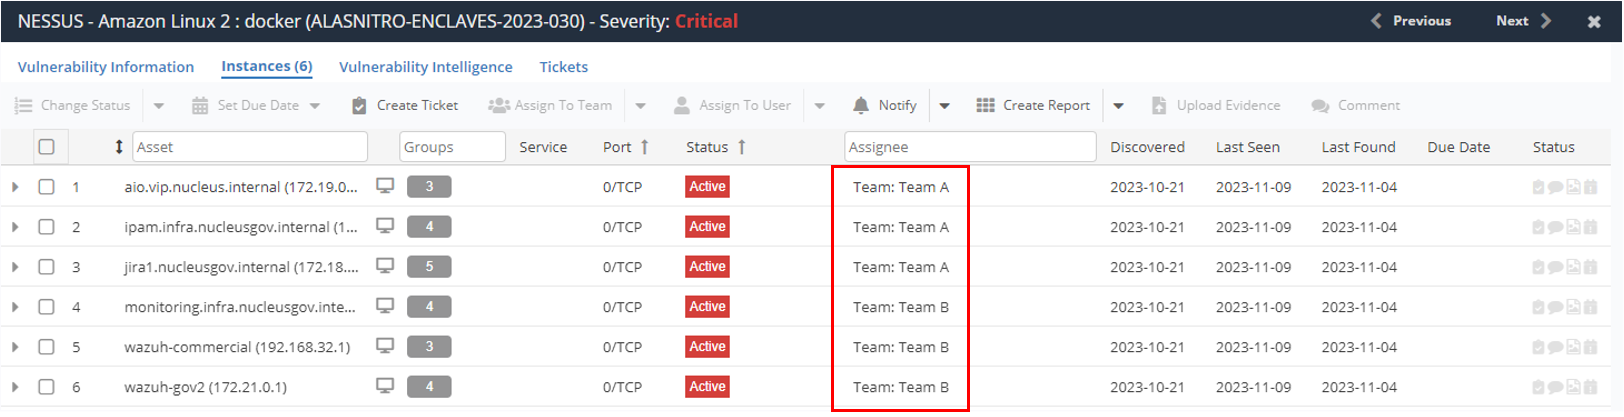
The following steps demonstrate configuring the ServiceNow App connector to automatically group created tickets based on the Assigned Team set on vulnerability instances in Nucleus. Consider the following scenario:
- Based on your ingest and asset processing automation rules, you have a vulnerability in Nucleus that has 6 instances.
- 3 instances are assigned to Team A and 3 are assigned to Team B.
You want to configure Nucleus to group the tickets created for the vulnerability by the Assigned Team on finding instance: 2 parent tickets, one for Team A and one for Team B, each with 3 child tickets based on their Assigned Team Name in Nucleus.
Step-by-step instructions to configure grouping:
-
In ServiceNow, go to Manage Projects under Nucleus Security > Administration:
-
Click on the Project ID you want to enable Group By on.
-
Check the
Use Group Byoption, then click Update:
-
Open the project again, then click on the Field Mapping (Group By) tab:
-
Click the New button to add a new Group By mapping field and complete all required fields:
-
Set the values for each field in the mapping as shown in the image, or by referring to the table below:
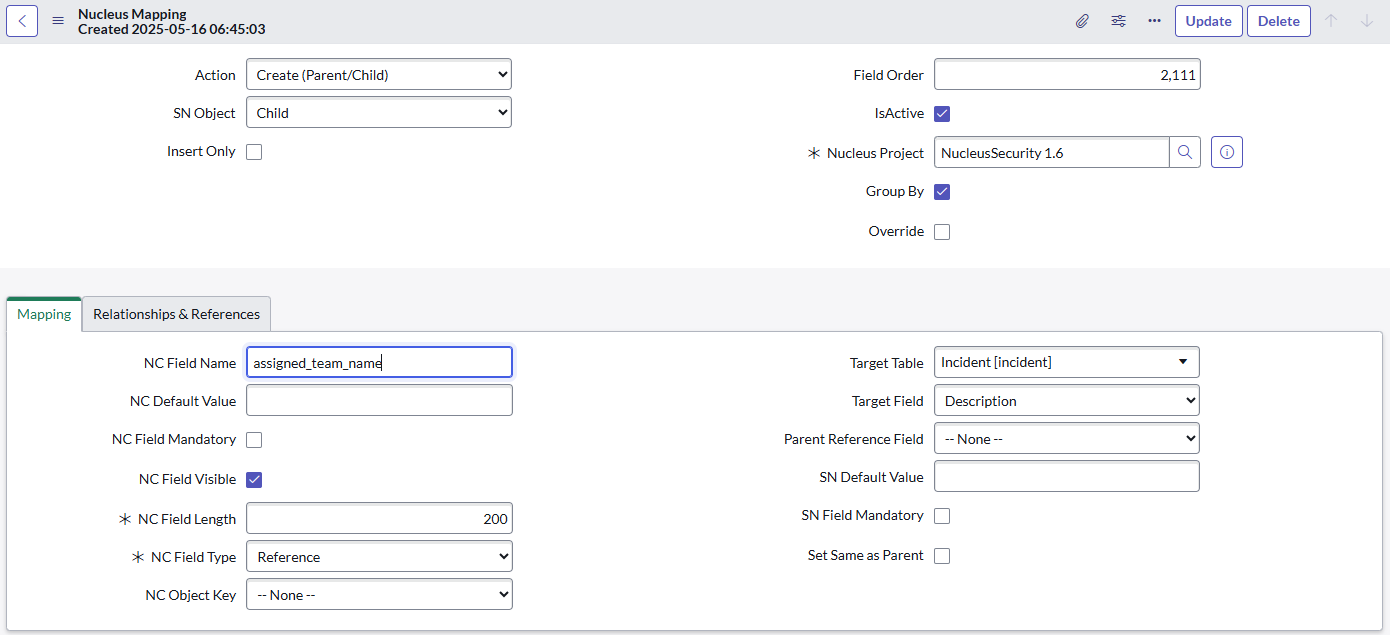
| Field Name | Value |
|---|---|
Action |
Create (Parent/Child) |
SN Object |
Child |
Field Order |
Enter a number greater than 1020 and is unique to the project. |
IsActive |
checked |
Nucleus Project |
Should automatifally default to your Nucleus Project. |
Group By |
checked |
NC Field Name |
assigned_team_name |
NC Default Value |
blank |
NC Field Mandatory |
unchecked |
NC Field Visible |
unchecked |
NC Object Key |
--None-- |
Target Table |
Incident [incident] |
Target Field |
Description |
Parent Reference Field |
--None-- |
SN Default Value |
blank |
SN Field Mandatory |
unchecked |
- Click Submit to save your changes.
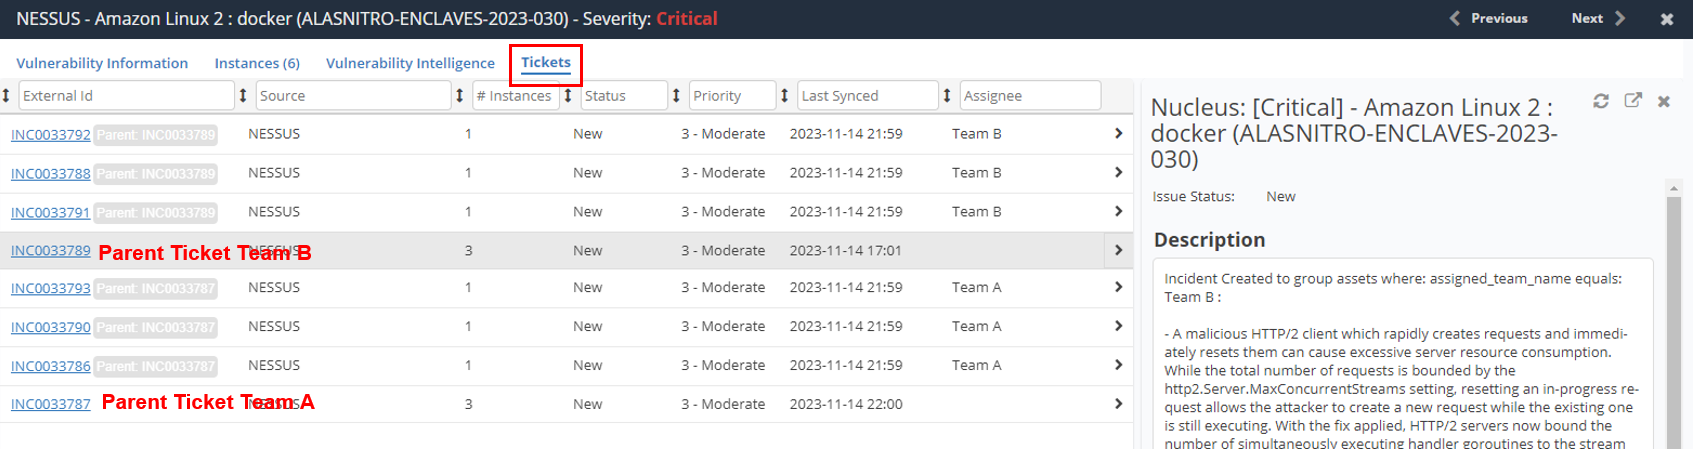
Testing ticket creation using Group By:
-
Find a vulnerability with muliple instances assigned to different teams, for example:
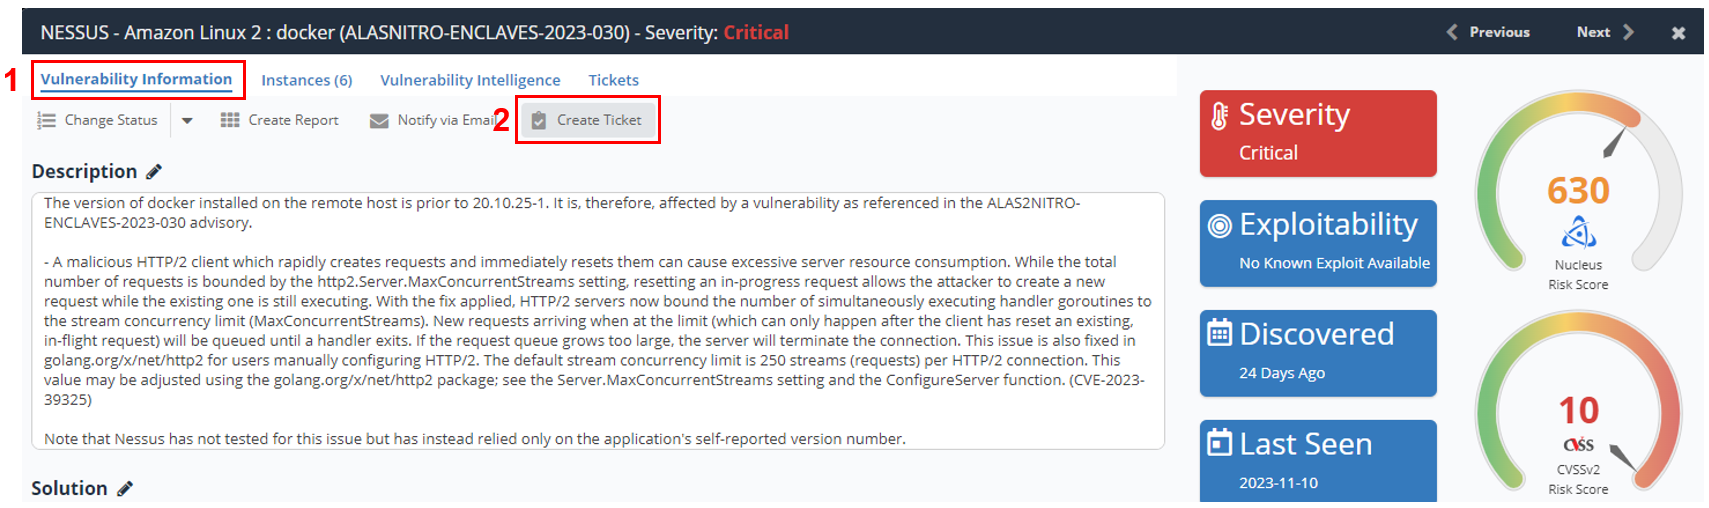
-
Click on the Vulnerability Information tab, then click Create Ticket:
-
Select your ServiceNow connector, ensure Ticketing is the selected module, then click Submit to ServiceNow.
-
Finally, click on the Tickets tab to view the tickets that were created, note that there is an individual Parent ticket for each team, with child tickets for each instance assigned to that team: